
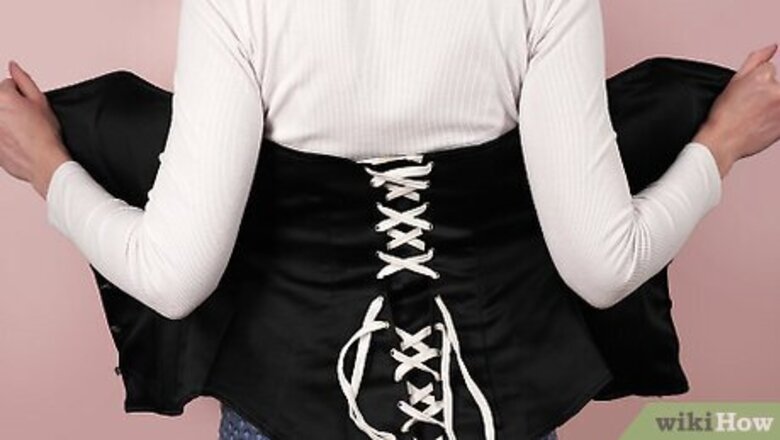
- Wrap the corset around your waist with the laces flat against your back and the busk facing your chest. Then, fasten the buttons on the busk.
- Adjust the corset so the smallest part rests against your waist. Then, grab and pull the pull loops (also called bunny ear loops) to tighten the corset.
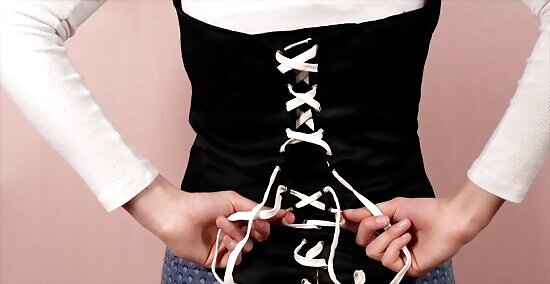
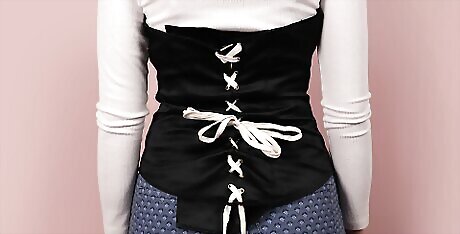
- Pull the laces away from your back and pull on the pull loops again to remove the slack. When the corset is snug, tie the pull loops into a bow.
Putting on and Tightening a Corset

Loosen the laces and wrap the corset around your back. Pull up on the laces to loosen the corset so it’s easier to put on. Then, wrap the corset around your body so the lacing rests against your back and the busk, or the front of the corset with the hooks and buttons, faces your chest. The bottom of the corset typically has a knot at the laces and tabs for attaching a garter. The top of the corset is usually more straight than the bottom. Wear a corset liner underneath your corset to protect it from moisture and dirt on your skin. Just choose a liner made of a breathable fabric, like cotton.
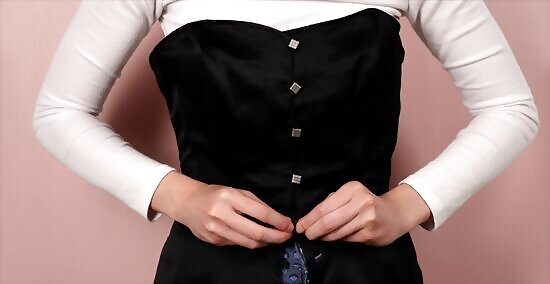
Hook the busk together. Starting from either the top or bottom of the busk, insert the hook through the button. Then, move your way down or up the busk to fasten the rest of the hooks. The hooks sometimes come undone as you attach the rest of the busk, so it may take a few tries to fasten the busk. At this point, your corset should be fairly loose. If you are pulling hard at the corset or sucking in your stomach to fasten the busk, loosen the corset’s laces. Some people find that the busk is easier to close when it's more snug than loose. Experiment with the tightness of your corset to find what works for you.

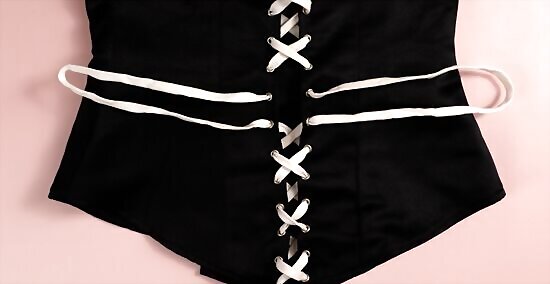
Adjust the corset so it sits at your waist. Pull the corset up or down your body to ensure the smallest part rests against your waist, which is just under your ribs and above your hips. The waistline of the corset typically has boning running horizontally through it. It is also where the pull loops (also called bunny ear loops) of the lacing are. If your corset has a modesty panel, or a piece of fabric underneath the lacing, adjust it so it sits flat across your back.
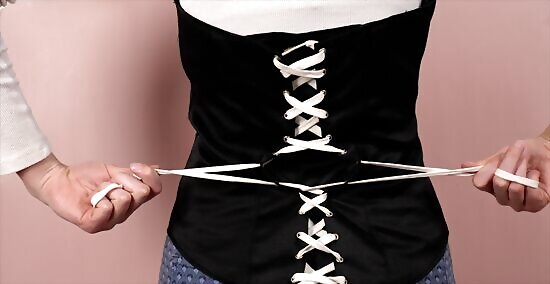
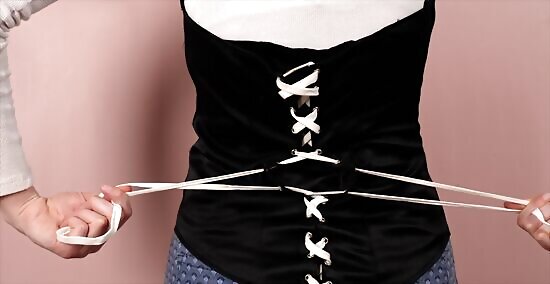
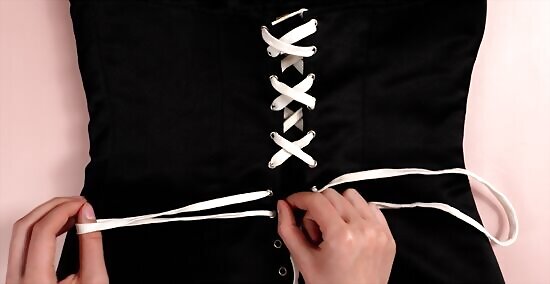
Tug on the corset’s pull loops to tighten the corset. Grab the 2 looped laces on the back of your corset that rest just at your waistline; these are commonly called the pull loops or bunny ear loops. Then, gently tug on the loops to tighten the corset.
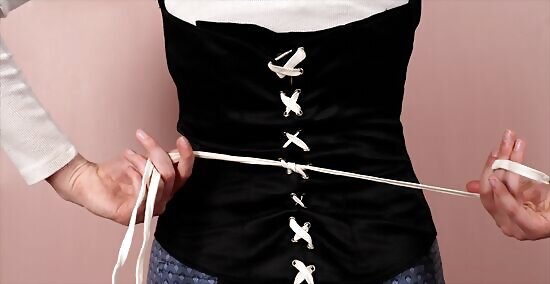
Pull the criss-cross laces and pull loops to remove slack. Grab the criss-cross lacing at the top of the corset and pull it away from your back. Then, move down and pull at the lacing until you reach the pull loops. Tug at the pull loops to tighten the top half of the corset. Do the same for the bottom half of the corset, pulling at the bottom criss-cross lace and moving up until you reach the pull loops. Then, pull on the loops to tighten the bottom of the corset. Tip: Stand in front of a mirror to make tightening the laces easier. This helps you see what you’re doing and where any slack remains. If your corset has a modest panel, it might bunch up as you tighten the laces. Just adjust it so it lays flat against your back. How tight you make the corset has to do with the quality and fit of your corset.
Stop tightening the corset when it feels snug, but not uncomfortable. Keep pulling at the criss-cross laces at the top and bottom of the corset to remove the slack and tighten the corset to your liking. Just stop adjusting the corset when it’s comfortably tight. Loosen and pull out the laces if you’re having trouble moving or breathing, or feel pinched by the corset. Note: If this is your first time wearing the corset, do not tighten it all the way. Keep it snug but fairly loose to help break in the boning of the corset.
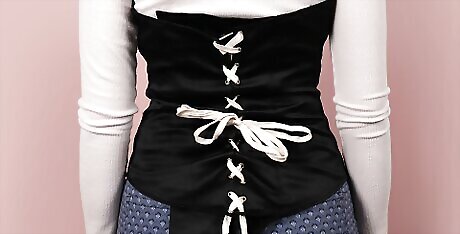
Tie the pull loops into a bow. Loop the 2 pull loops together and give them one final squeeze to ensure the corset stays at your desired tightness. Then, tie the loops into a bow. If you want added security, double-knot the bow. Tip: Look in a mirror when tying the loops into a bow to make the process easier. If the pull loops are very long, get a smoother look by looping the laces around your stomach and then making a smaller bow at the back. Do not tie the laces into a knot, as this can make it difficult to untie and take off your corset.
Adjust your corset as necessary. When you’re completely laced into your corset, take a look at yourself in the mirror. Ensure the corset is smooth at the front and gives you the shape you’re looking for. Then, look at the back lacing to make sure there’s a small gap and that the sides are perfectly parallel. If there are any large gaps or bulges, tighten or loosen your corset as necessary. This can also be a sign that you need a smaller or larger corset. Style your corset by itself or under your clothes to define your figure. Or, wear it over dresses and shirts or under sheer tops for a feminine yet edgy look. EXPERT TIP Stephanie Fajardo Stephanie Fajardo Professional Stylist Stephanie Fajardo is a Personal Stylist based in Portland, Oregon. Stephanie has over 17 years of styling experience in personal consulting, television, photography, and film shoots. Her work has been featured in Esquire Magazine and Portland Fashion Week. Stephanie Fajardo Stephanie Fajardo Professional Stylist "For an elegant event, wear your corset under a shawl or jacket, along with a very full, long skirt."
Lacing a Corset
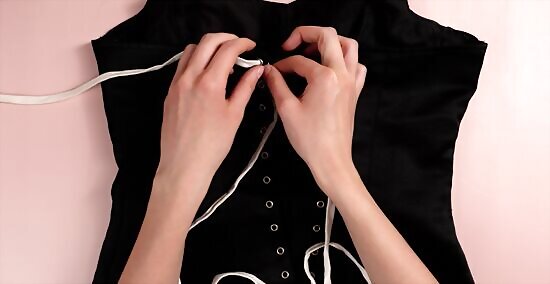
Push each end of the lace up through the top grommets. Take one end of the lace and push it up through the grommet at the top of the corset, threading it from the inside of the corset to the outside. Then, take the other end of the lace and push it up through the top grommet on the other side of the corset. Pull the laces all the way through the grommet and ensure they’re even on both sides. Then, straighten them out if they get twisted. Note: If your corset has an odd number of grommets, push the laces down through the grommets. Then, follow the opposite of the pattern below. If your corset didn’t come with laces, ensure your laces are at least 26 feet (8 m) long. Use double-faced satin ribbon or paracord. If your corset came pre-laced, don’t worry about lacing your corset unless it was laced incorrectly or you want to try a different lacing style.
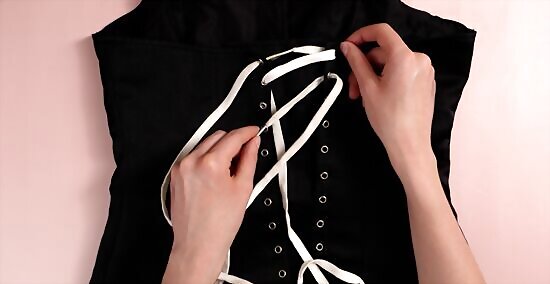
Thread each lace down through the grommet diagonal to it. Take the right end of the lace and hold it over the grommet below it and on the left side, or diagonal to it. Then, push the lace down through the grommet, threading it from the outside of the corset to the inside. Do the same thread with the left end of the lace, pulling it down through the grommet diagonal to it. This creates the classic “X” or criss-cross pattern. Keep your laces even and straight. Make sure the ends of the laces are an equal length as you pull the laces through the grommets.
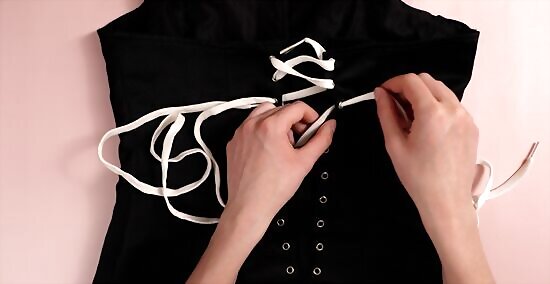
Pull each lace up through the grommet diagonal to it. Instead of pushing the right lace down through the grommet again, thread it up through the diagonal grommet so you’re moving from inside the corset to the outside. Simply repeat this with the left lace, pulling it up through the grommet diagonal to it. This creates a criss-cross pattern with the Xs alternating “above” and “below” the corset. This helps you get an even and tight fit.
Repeat the lacing pattern until you get to the center of the corset. Keep creating the “X” lacing pattern down the corset. Just alternate between threading the laces down through the grommets (so the X is “above” the corset) and then up through the grommets (so the X is “below” the corset). When you reach the center of the corset, or where the waistline and waist tape rests, stop lacing. On some corsets, the center is designated by 2 grommets that are close together.
Push each lace down through the grommet below it. Take the right lace and push it down through the grommet directly below it, threading the lace from outside the corset to the inside. Then, do the same with the left lace. Push the left lace down through the grommet directly below it. Do not pull the lace all the way through the grommets. This creates your pull loops (also called bunny ear loops), so leave a lot of slack for the loops.
Repeat the alternating “X” pattern until you reach the bottom. Take the right lace and push it up through the grommet diagonal to it. Do the same thread with the left lace. Then, grab the right lace and thread it down through the grommet diagonal to it. Repeat this with the left lace. Just keep alternating the criss-cross pattern to create the Xs “below” and “above.” the corset.
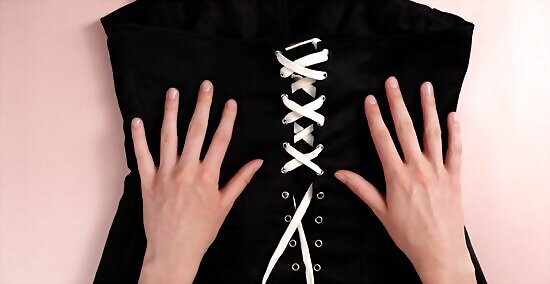
Tie the ends of the laces in a knot. Hold the ends of the laces together and create a loop. Then, pull the ends of the laces through the loop. Or, tie a square knot. Cross the left lace over the right lace and tie a knot. Then, cross the same lace (which is now in your right hand) over the other lace and tie a knot. You might have a lot of slack at the end of the lace after you’re done lacing. Just pull on the criss-cross laces to get rid of the slack. Alternatively, cut off any excess lacing that you don’t need.


Comments
0 comment