

Materials
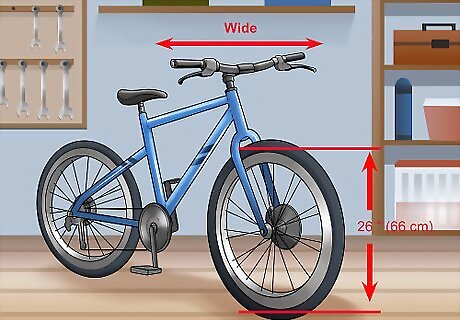
Select a mountain bike front disc brakes and wide handlebars. If you don't own a bike already, search online or in your local area to find a second-hand bike at a good price. Luckily, you can use just about any bike you have on hand, though certain features will yield the best results: Choose a bike with wheels that are 26", 20", or 16" as these are the most common off-the-shelf wheel sizes. The smaller the wheels are usually found on folding bikes and will accelerate more quickly, be bumpier, and be less efficient at cruising speed. Mountain bikes are most commonly converted to electric bikes, though you could use a different type as long as it has a strong frame and standard bottom bracket. Don’t use a bike with a carbon fiber frame or forks, as these aren’t strong enough to support the extra weight or handle the extra torque. Wider handlebars are best as they give you plenty of room for all your accessories and lights. Front disc brakes will make it easier for you to stop on steep hills.
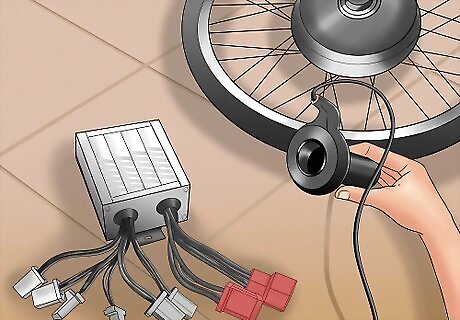
Pick up an electric bicycle conversion kit. If you’ve never built an electric bicycle before, a conversion kit will make the process much simpler. These bolt-on kits contain a throttle, speed controller, and a wheel with a hub motor. Some also come with gauges, displays, and brake levers, though these are not strictly necessary. Ensure the kit comes with a wheel that is the same size as the existing wheels on your bike! It’s much easier to replace the front wheel than the back, due to the position of the gears, so opt for a kit in which the hub motor is on the front wheel. In most cases, the battery doesn’t come with the conversion kit. For ease of installation, though, it’s best to purchase the battery and the conversion kit from the same manufacturer.
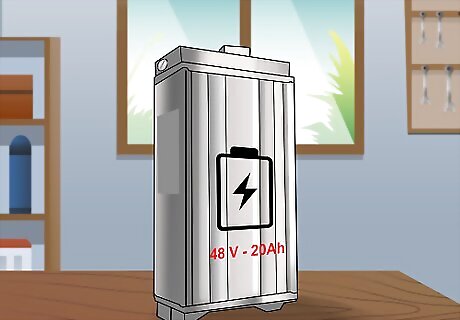
Choose a 36- or 48-volt battery with a capacity of 10Ah or 20Ah. Choose a battery designed for use on an electric bicycle, as it will come with a charger and be much easier to install. Make sure the voltage and capacity of the battery you choose are compatible with the conversion kit you purchased. The higher the voltage of your bike's battery, the more powerful your bike will be. When building an electric bike, choose a 36- or 48-volt battery to allow for speed and comfort. The capacity of the battery defines how long it'll last. If you’ll be taking short trips, a 10Ah will suit you well, while a 20Ah battery will provide you with extra capacity for slightly longer journeys.
Wheel Replacement
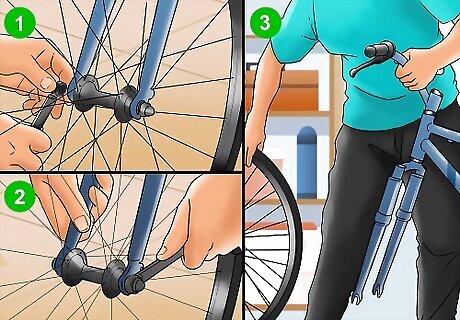
Remove the wheel you need to replace. Begin by opening the rim or cantilever brake using the lever (if applicable). If the bike has disc brakes, remove the retaining or cotter pin or the clips or springs that hold the pads in place. Pull the pads out with needle-nose pliers and set them aside. To remove the front wheel, turn the bike over so it’s sitting on the seat and handlebars, then flip the quick-release lever over to the “open” position. Then, simply lift the front wheel off of the bike. To remove the back wheel, crouch behind the bike. Hold the frame with your non-dominant hand and use your dominant hand to pull the derailer backward. Then lift the bike frame up and off of the rear wheel with your non-dominant hand and unhook the chain with your dominant hand.
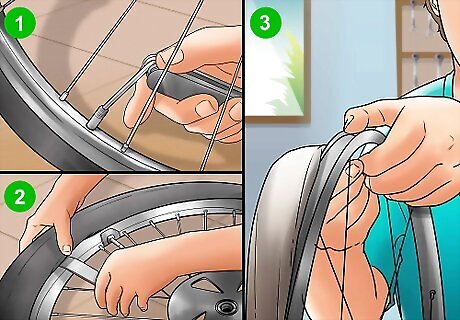
Transfer the tire and inner tube from the old wheel to the new wheel. Let the air out of the old tire and use a tire lever to separate the tire from the wheel. Pull off both the tire and the inner tube. Reverse the process to install the tire and inner tube on the wheel that came with the conversion kit.
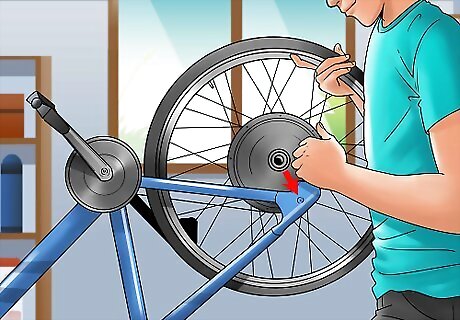
Put the wheel with the electric hub on your bike and connect the brake components. Simply reverse the process you used to remove the wheel in order to reinstall it. Be sure to adjust the chain so it fits properly if you’re replacing the back wheel. If the bike has rim or cantilever brakes, simply close them over the new wheel using the lever. If the bike has disc brakes, put the pads back in place and secure them using the clips, springs, or cotter or retaining pin. Adjust the brakes as needed, either by aligning the calipers (for mechanical brakes) or pumping the brake lever (for hydraulic brakes).
Final Installations

Attach the speed controller and the throttle. Follow the directions in the conversion kit for installing these 2 parts using the included hardware. Use the provided bolts to secure the speed controller to the frame of the bike above the chain. Then, attach the throttle to the handlebars so it’s easy to reach. If you have any other accessories, attach them as well. Secure the speed sensor to the back wheel and connect any displays and gauges to the handlebars with the included hardware. Follow step-by-step guidance to build an e-bike. "As a handy tinkerer with sights on converting an old moped or bike into electric transport, I loved the detailed walkthrough here. The photos make parts like the throttle and controller way less intimidating to install. Though some battery wiring shots need updating, between this guidance and my DIY confidence, building an affordable e-bike seems totally doable!" - Wesley M. Slash e-bike costs through DIY build. "With steep price tags on pre-built models, I've wondered if crafting an e-bike myself could save money. This article boosted my optimism! It highlights buying a used bike and conversion kit online to pinch pennies. Even adding a battery, it seems that with some hunting for deals and a get-your-hands-dirty spirit, I can create electric transportation on the cheap. My savings quest begins!" - John L. Leverage build pointers for custom e-bikes. "As a novice tinkerer attempting my first e-bike using the motor and controls shown here, I'll admit more hand-holding details would ease some confusion. But I picked up helpful tips on bike criteria, basics on installing the kit parts, and warnings about electrical shorts. Taking it step-by-step, aided by these crumbs of wisdom, I can better customize a ride to suit my needs and skills." - Mac A. Repurpose bike parts into bandsaw. "My need for an affordable bandsaw led me to ponder morphing bike components into the rolling base, tensioned tires, and stopping power. Spotting the conversion concept here sparked imaginative possibilities! Subbing their motor for a bandsaw blade, the bike's brawny frame, quality wheels, and handy brakes could craft a unique woodworking tool. It seems that many parts could crossover. The creative juices now flow!" - Vivian P. Have a story our readers should hear? Share it with 1 billion+ annual wikiHow users. Tell us your story here.
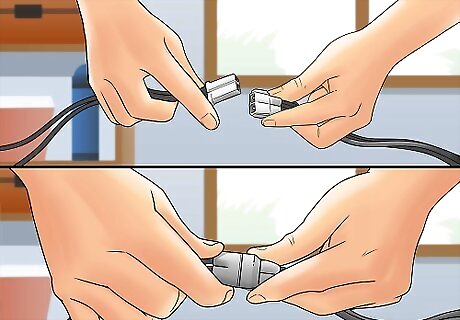
Connect the battery to the speed controller and the throttle. Follow the instructions included with the kit to connect each part. Typically, you’ll only need to plug the connector on the speed controller into the connector on the battery, then repeat the process for the throttle. Be sure not to touch the battery wires together, as this could create a dangerous spark!
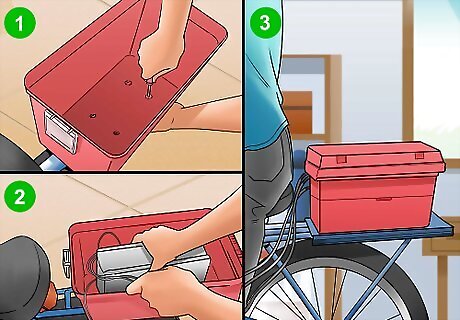
Mount the battery onto the bike. Most e-bike batteries are designed to fit on the frame in place of a water bottle holder. This is the ideal placement since it keeps the center of gravity low. Use the included hardware to attach the battery to the frame as indicated by the instructions that came with the battery. Alternatively, you could place the battery in a box or basket on the front or back of the bike, particularly if it is too large to fit well on the frame (such as if it’s more than 60 volts).
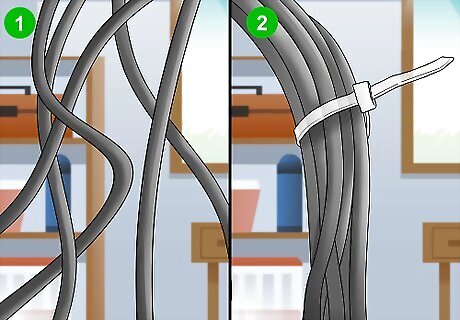
Secure any loose cables. Use zip-ties to attach any loose parts to the frame. Keep safety in mind as you don’t want any cables to get caught while you’re riding.

Ride your electric bike. That’s it! You can now cruise around on your e-bike. Just press down gently on the throttle when you’re ready to ride. Go for a test drive in a less populated area so you can get used to it before you take it out on the road.
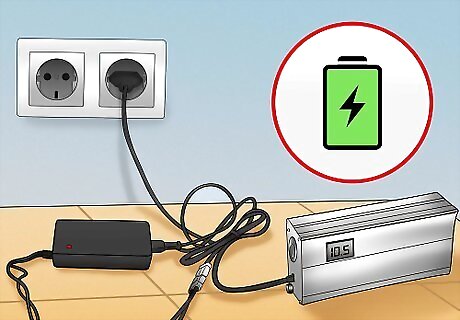
Charge the bike when necessary. The e-bike battery comes with a charger, making the process super simple. Follow the instructions for connecting the battery to the charger and plug it into a compatible outlet whenever you need to.


Comments
0 comment