views
Making the Text

Be sure that you have the Cycles Render option. Also, make sure that you have Default for the other option.

Start with the default file, the cube. Then, delete the cube by pressing X. Screenshot 2025 05 12 091314.png
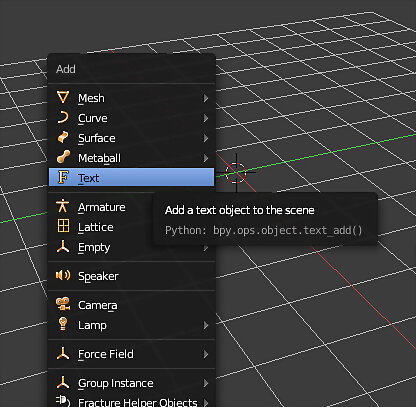
Press shift+A >> Text. This will add text to your scene.
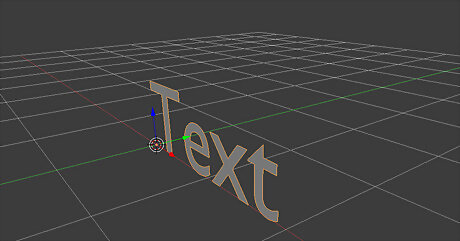
Press R >> X >> 90 >> Enter. This will have your text perfectly aligned.
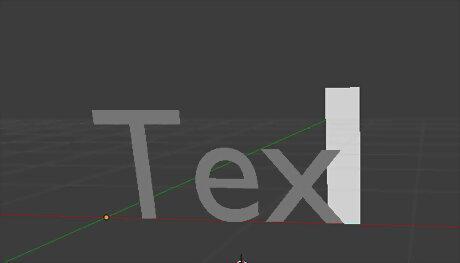
Change the text. You need to be in Edit Mode to do that. You can go to Edit Mode by pressing your Tab key. The large white area you see in the screenshot is your cursor. Delete the text and put in what you want.
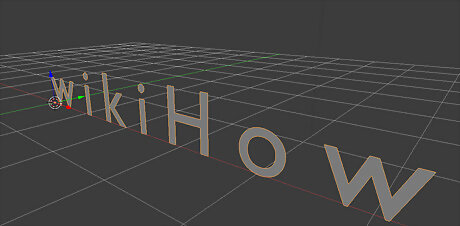
Type in your text with one space between each letter.
Switch back to Object Mode (Tab).

Press Alt+C to convert the text into a mesh. Screenshot 2025 05 12 091751.png
Switch back into edit mode
Press 1 and 5 on the numpad to enter front orthographic view.

Enter face select mode with the button at the bottom of the 3D viewport. Screenshot 2025 05 12 093046.png

Press B, then click and drag over your entire text. This will select one side of the letters for us to extrude.
Press E to extrude, then type 0.1 to extrude the text. Confirm by pressing Enter.
Leave edit mode by pressing tab

Navigate to the Modifiers tab. Screenshot 2025 05 12 092142.png
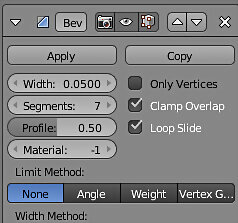
Add a Bevel modifier and adjust it to match the settings shown in the screenshot.
Press ctrl+S to save the project
Making the Ice
Go to Add >> Mesh >> Plane.
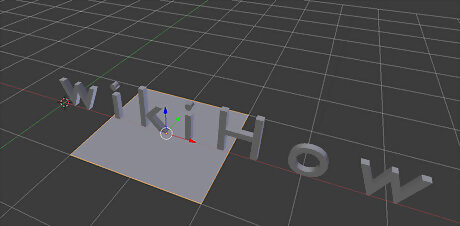
# Type G >> X >> 2 to center the plane under the text.
Enlarge it so that it will 'hold' the text. Press S >> 5 >> Enter. This will increase its size by 5 times.

Press 5 (Num Pad) and then 1 (Num Pad). Then zoom in very closely so that you can have your text just above your surface. Use your directional arrows to make the adjustments.
Making the Container for Water
Go to Add >> Mesh >> Cube.
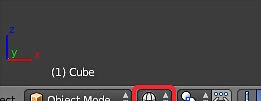
Change display to wireframe.pngChange the Display Method to Wireframe so that you can see both the cube and the text.
Press S >> 3 (You would put whatever works for your text. Because the word wikiHow is larger, the cube was scaled up 3 times.
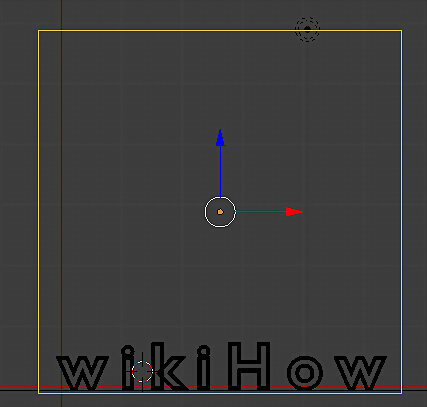
Center the box so that it is 'holding' your text using the directional arrows.
Hold down the Shift key while using the middle mouse button to move your objects more to the bottom of your screen. By now, it will probably be at the top.
Adding a Light Source
Click right above the cube around your text to give you a point of origin.
Go to Add >> Mesh >> Plane.
Hold down the middle mouse button and rotate the view. You want to make sure your cube is around the text and the plane is centered above it. You might want to make your light source a little larger. Try something like 2.5 (if you used 3 before).
Set the material for the light source.
Double check that you have selected Cycles Render.
Click on the material modifier, then New. Choose Emission from the options. That is because it will be emitting light. Set the Strength to 20.
Putting It All Together
Right click on the bottom surface (table) that you created to select it.
Select the Material Modifier icon and add New again. This time, leave it at default.

Click on the World icon. Screenshot 2025 05 14 082733.png
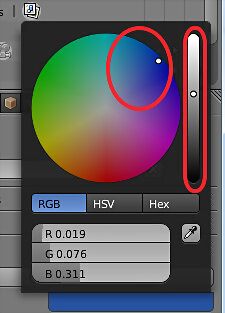
Locate the Surface dialog and change the color. To match the color used in this tutorial, you can paste in the hex code "264E97" Click on the muted color that you see there. Go to the Value bar (black and white stripe) and increase the values there. Instead of close to the bottom, put it about midway, as you see in the screenshot. Go to the color wheel and choose a blue, such as what you might see in ice.
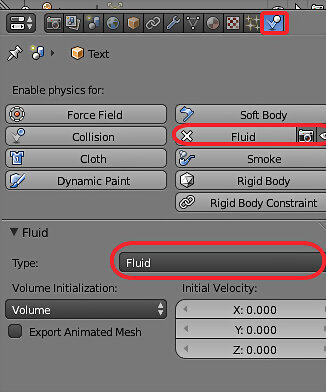
Turn your text into mesh. Right click on the text to select it. Press ALT + C. Then select Mesh from Curve/Meta/Surf/Text. Select the Physics icon. Choose the Physics for: Fluid option. Under the Type of Fluid, choose Fluid.
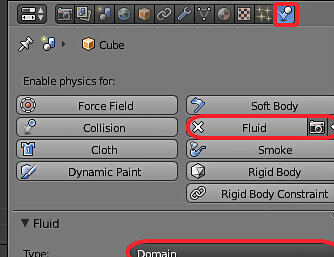
Change the Physics of the box (container) to hold water. Right click on the box to select it. Choose the Physics for: Fluid option. Physics settings 1.pngUnder the Type of Fluid, choose Domain. (Now it will hold water.)
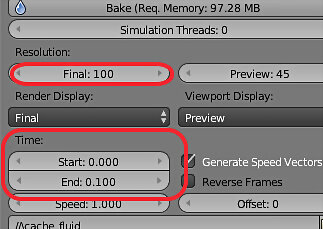
Physics settings.pngChange the Resolution to 100 and set the Time to End at 0.1.

End at 20.pngBelow the Timeline, at the bottom of your screen, change the End number to 20.
Click the Bake button (Under the Domain Type). Depending on your system, it could take a few seconds or a few minutes.
Once it is complete, go to where you changed the Frame count to 20. Using the arrows, go through the Frames until you find one that is appearing to melt, but still legible.
Right click on the text. This will select the original text, not the text you just 'melted'.
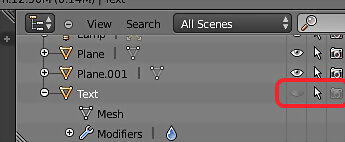
Go to the upper right corner of your screen where your image layers are. Find the one that says Text. Click on the camera and the eye so that they are grayed out.Hiding text.png
Set the material for the Fluid text. Right click on the Fluid text to select it. Click on the Material modifier and then New. Select Glass BSDF for the surface material.
Set up the camera view. Go to View >> Front. Hold down the Shift key and the middle mouse button and center your text in the screen. Zoom in to the bottom of the text. With the 'melting', the table will no longer be in contact with the text. Adjust this until they are almost touching again. Leave a small space between the two surfaces. Center your image again in your screen. Go to View >> Align View >> Align Active Camera to View. Go to View >> Properties. Select Lock Camera to View. Turn the Properties menu off by Selecting View >> Properties again. Move your text around until it looks like you want it to look, placement wise.

Render your text. Click on the Camera and then press Render. For the initial run, leave it at default.Initial ice render.png Screenshot 2025 05 14 084600.png If you want to get rid of the sharpness and angularity that you see here, press ESC and right click your text. Go to the Shading option on the left of your screen, and select Smooth. Click on the Render button again to try out that look. Go to the Sampling option further down. Change the Render to 500. Start the Render.
Wait for the render to be done.
Once it is done rendering, if you like the way it looks, then, while holding the cursor over the text, press F3.
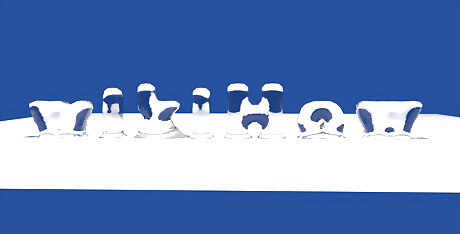
Save it with an appropriate name. If you don't want it to be a PNG file, then, in the lower right hand part of the screen, you can change that.







Comments
0 comment