views
Creating a Background Layer
Click the Layers tab.. It's at the top of the panel menu that is usually on the right side. It may also be under an icon that resembles two rectangles stacked on top of each other in the icon panel to the right. Alternatively, you can click Window in the menu bar and then click Layers to open the Layers menu.
Click the "Create Layer" icon. It's the icon that resembles a square with a plus (+) sign in the middle. It's at the bottom of the Layers panel. This will create a new layer. On older versions of Illustrator, this icon appears as a blank page at the bottom of the Layers panel.

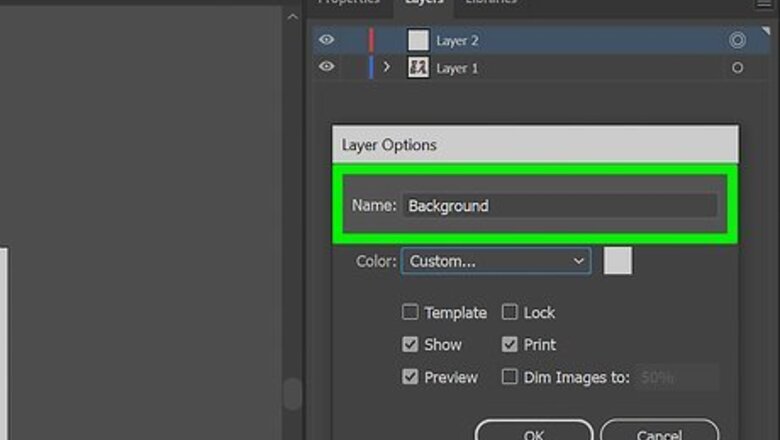
Rename the new layer "Background." Use the following steps to rename the layer: Double-click the new layer you created in the Layers panel. Type "Background" next to "Name". Click Ok.
Drag the layer to the bottom. You can move layers in the Layers menu by clicking and dragging them. Drag the Background layer to the bottom of the list. This ensures that all objects and artwork in the background layer appear behind all other layers in your Illustrator file.
Create your background artwork. Use the art tools to create your background artwork. If you just want to use a single color for your artwork, use the rectangle tool to draw a rectangle the size of the artboard. Click the Fill square at the top or under the "Properties" tab and select a color for the rectangle. Alternatively, you can use the gradient tool to create a gradient blend for your background rectangle. If there are objects in any of the other layers obstructing your view of the background layer, click the eyeball icon next to all other layers in the Layers menu to hide those layers. You can also place a raster image, such as JPEG or PNG into the background layer. To do so, click File in the menu bar followed by Place. Then select an image file and click Open. Use the Select Tool to adjust the image position. Make sure the image covers your entire artboard.
Lock the background layer in place. Once you are finished creating your background, open the Layers menu. Click the empty square next to the eyeball icon next to the Background layer. You should see a lock icon appear next to the background layer. This locks the layer in place and prevents you from accidentally editing the background layer while you work on your other artwork.
Creating a Clipping Mask

Place an image in Illustrator. This can be any image with a background you want to remove. This includes raster images (i.g. JPEG, PNG, PDF) or vector images (i.g. SVG, EPS). To place an image in Illustrator, click File in the menu bar at the top. Then click Place. Select an image and click Open. Use the selection tool to adjust the position of the image. If the image is in vector format, you only need to click the background objects to select them and press "Delete" to remove them. If you place a raster image that has only a few colors and is not too detailed, you can use Live Trace to convert the image to vector format. Then you can just double-click the background objects and press "Delete" to remove them.
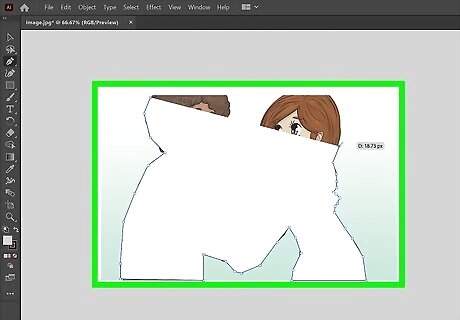
Use the Pen tool to trace the objects you want to keep. This will create a new vector shape over the object in the image you want to keep. Use the following steps to use the Pen tool. Click the icon that resembles the head of a fountain pen in the toolbar. Click along the edge of the object you want to keep to create a new vector point. Click another spot along the edge to create a new vector point and a straight line between the two vector points. Click and hold another spot and drag to create a curved line. Click another spot to continue the curved line. Click the previous vector point to change the direction of the curve or create a new straight line. Alternatively, you can use the rectangle and ellipse tools to create rectangular and circular shapes. Then use the tools in the Pathfinder tools to combine shapes, or subtract from the shape.
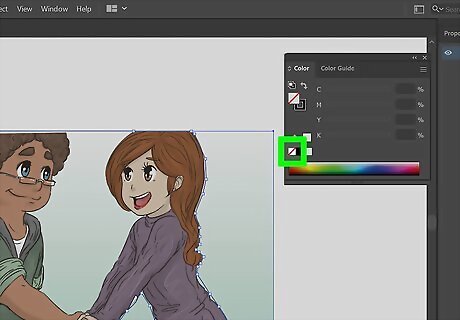
Remove the color of the shape. When tracing an outline around a shape, the fill color may cover the object you are tracing. Use the following steps to remove the color of the shape and just use a colored outline around the shape. Click the icon that resembles a paint pallete or click Window followed by Color to open the Color menu. Click the solid square icon to select the fill color. Click the icon that resembles a white box with a red line through it to turn off the color. Click the icon that resembles a hollow square to select the outline. Use the color picker to select a color for the outline.
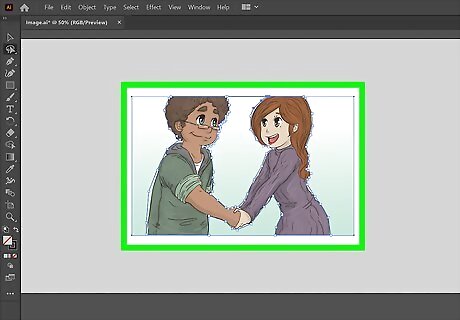
Select the outline and the image background. Once you have a shape drawn around the object you want to keep, hold "Shift" and select both the background image and the outline shape. The object you want to use as a clipping mask should be on top. To move it to the top, select the background image with the Select tool. Then click Object followed by Arrange. Click Send Backward or Send to Back.

Click Object. It's in the menu bar at the top. This displays the Object menu.

Hover over Clipping Mask. This displays a submenu for creating and releasing a clipping mask.
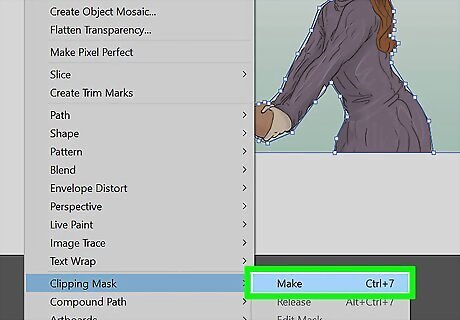
Click Make. This creates a new clipping mask using the shape you drew. This will hide everything except what is within the clipping mask shape that you drew. This removes the background layer. You can now create a new background layer for your background.
Altering the Color of the Artboard

Open “Document Setup.” While it is possible to alter the color of the artboard itself, this change is only visible in the digital version of the project. The altered artboard color will not appear in any printed versions of your work. Select File and choose Document Setup from the drop down menu. This change only exists within Adobe Illustrator. When you print or export your project, the artboard will revert to its original white color. To change the background color permanently, you need to create a separate background layer.
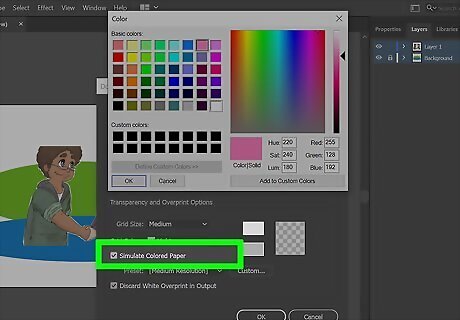
Click the checkbox next to "Simulate Colored Paper." It's in the section labeled "Transparency." The “Simulate Colored Paper” feature mimics actual paper. The darker the paper, the darker your artwork will appear. If you set the background color to black, your artwork would disappear because it would not be visible on real black paper.
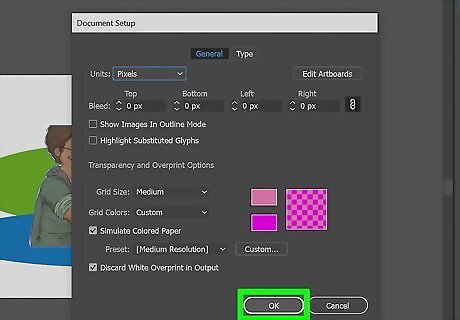
Change the background color. Use the following steps to change the background color: Click on the white rectangle to open up a “Color Palette” dialogue box. Click a color from one of the swatches or color picker. Click Ok.
Viewing and Changing the Transparency Grid
Turn on the Transparency Grid. The transparency grid displays a checkerboard pattern of white and grey squares. It allows you to see transparent parts of an image. Use the following steps to turn on the transparency grid: Click View in the menu bar at the top. Click Show Transparency Grid.
Open the Document Setup menu. Use the following steps to do so: Click File in the menu bar the top. Click Document Setup.
Click the light-colored square. It's the square on top next to "Transparency and Overprint Options."
Select a color. Click one of the colored swatches or use the color picker to select a color you want to use for the light-colored squares in the transparency grid.
Click the darker-colored square. It's the square on the bottom next to "Transparency and Overprint Options."
Select a color. Click one of the colored swatches or use the color picker to select a color you want to use for the darker-colored squares in the transparency grid.
Click Ok. It's at the bottom of the Document Setup menu. This saves your color choices for the transparency grid.
Change the User Interface Brightness
Open the User Interface preferences menu. Use the following steps to do so: Click Edit (on Windows) or Illustrator (on Mac) in the menu bar at the top. Click Preferences. Click User Interface.
Select a brightness level. Click one of the four shaded squares at the top to select a brightness level for the user interface in Illustrator. You can select Black for a dark mode, dark grey, light grey, or white. If you are using an older version of Illustrator, use the slider bar instead.
Select a canvas color. If you want the artboard to match the brightness of the rest of the user interface, click "Match User Interface Brightness" next to "Canvas." If you want the artboard to remain it's usual white color, click "White" instead.
Click Ok. It's at the bottom of the menu.



Comments
0 comment