views
Understanding the Diagram's Setup

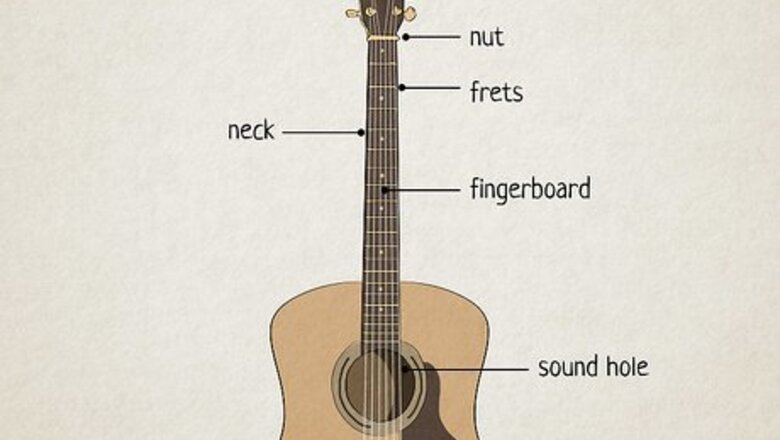
Hold your guitar straight up facing you. Take your guitar and hold it out in front of you so that the headstock is up top and look at the fretboard. This is the same orientation as a chord diagram. The thick bar at the top of the chord diagram represents the nut on your guitar. This is the white, cream, or black bar at the top of your guitar that lifts your strings over the frets. Chord diagrams are typically situated vertically like this. However, occasionally you might also encounter horizontal grids
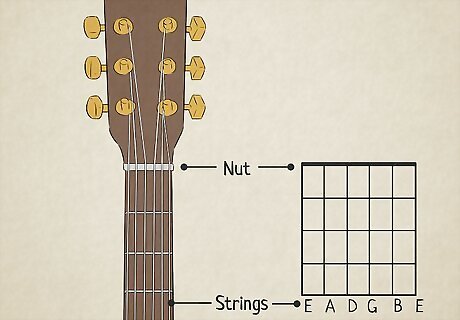
Identify the strings on the chord diagram. A chord diagram has 6 vertical lines, each of which corresponds to one of the 6 strings of your guitar. The left-most string on the diagram is the lowest string on your guitar. When you're holding your guitar straight up facing you, that string is also at the far left. Assuming you have standard tuning, each of those strings plays the notes E-A-D-G-B-E, when played from left to right. Some chord diagrams have the names of the strings at the bottom or top of the diagram, but they aren't strictly necessary. The strings are typically referred to by numbers so you know which string to play regardless of your tuning. The thickest, lowest string is the 6th string, the one to the right of it is the 5th string, and so on, all the way to the thinnest, highest string, which is the 1st string.
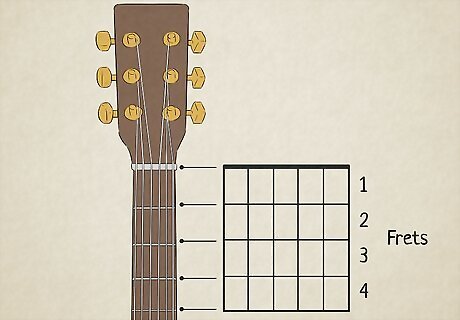
Count the frets to know where to place your fingers. The horizontal lines on a chord diagram represent the frets on your guitar — the metal bars that run across the neck. The highest fret, closest to the nut, is the first fret. The one below it is the second fret, and so on. Most chord diagrams show the first 4 frets. For your most basic chords, the ones you'll learn first when you learn to play guitar, your fretting hand will stay primarily within these first 4 frets.
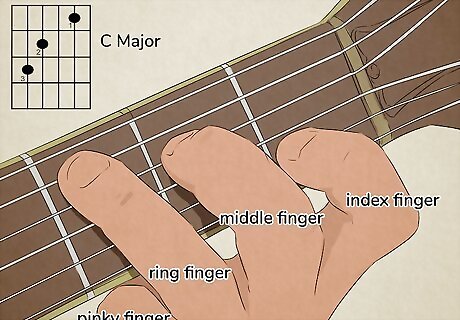
Match your fingers to the numbers on the chord diagram. Chord diagrams assign a number to each of the 4 fingers on your fretting hand. You don't normally use your thumb to fret chords. However, when you get into more advanced fingerings, you'll occasionally see the thumb used. When it is, it's represented by a "T." The universal numbers for your fingers are: 1: index or pointer finger 2: middle finger 3: ring finger 4: pinky finger
Playing the Chord on Your Guitar

Tune your guitar before playing. Always make sure your guitar is in tune before you start playing it. An electronic tuner can help you with this. Some beginner or student guitars come with electronic tuners. If you don't have one, buy one online or at your local music store. There are also smartphone apps that you can use to tune your guitar. Although these vary in quality and are never as good as an electronic tuner, they'll work in a pinch. Always tune your guitar every time you pick it up to start playing. This is especially important when you're just starting out because you want to train your ear to the correct pitches.
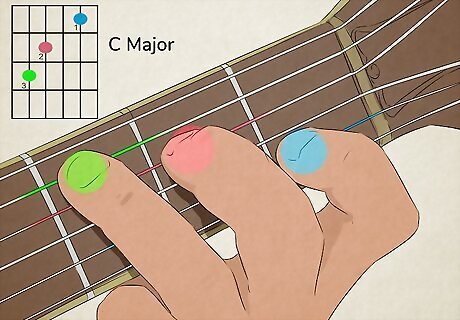
Place your fingers at the frets indicated by the chord diagram. A chord diagram has black dots at the frets where you're supposed to place your fingers to play that chord. Some diagrams include a number inside the dot, while others have the number written at the bottom of the chord. That number corresponds to the finger you're supposed to place on that string at that fret. To fret a note, place your finger just above the metal fret — not directly on the fret. For example, if you look at the chord diagram for a C chord, you'll see black dots on the 3rd fret of the 5th string, the 2nd fret of the 4th string, and the 1st fret of the 2nd string. The diagram also tells you to place your 3rd finger (ring finger) on the 5th string, your 2nd finger (middle finger) on the 4th string, and your 1st finger (index finger) on the 4th string. Place each finger on the string at the fret indicated. Then pluck each of the 6 strings and listen to the sound. If one of the strings buzzes or sounds muffled, that means one of your fretting fingers is also touching that string. Adjust your finger position until you're no longer doing that. It can take some practice to get it just right.

Check which strings you're supposed to play in the chord. For some chords, you'll strum all 6 strings of your guitar — but this isn't true for every chord. If you're not supposed to play a string, there will be an "X" above the string on the chord diagram. If there's an "O" over a string, that means you still strum the string, but you don't fret it anywhere. Don't play strings with an "X" over them at all. Especially with beginner chords, the strings you don't play are typically the outer strings, so you simply start or end your strum in a different place and leave them out. For example, the C chord diagram has an "X" over the 6th string, so you would only strum the 5th through the 1st strings. Note that on the C chord diagram, the 3rd and 1st strings have an "O," so you still strum them, but without fretting them anywhere.
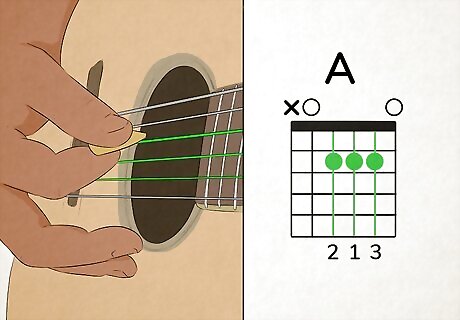
Strum your guitar with your fingers in position to play the chord. Once you've fretted the strings properly without buzzing or muting any other strings, strum the strings indicated on the chord diagram. The sound your guitar makes is the chord represented by the diagram. It doesn't matter if you strum up or down, you're still playing the same chord. However, you might notice that it sounds a little different if you strum down as opposed to if you strum up. Play around with different strumming patterns to get used to the sound of the chord.
Interpreting Advanced Chord Diagram Symbols

Read the fret number for diagrams showing frets below the 4th fret. More advanced chords require you to fret higher frets, even though the basic "chord shape" stays roughly the same. If a chord diagram includes higher frets, you'll see a number at the top of the diagram that tells you which fret the diagram starts at. Then you just count down the 3 frets from that point. For example, if a diagram starts on the 7th fret, that means it shows the 7th, 8th, 9th, and 10th frets. Diagrams that start at a different fret than the 1st typically don't have the thick line at the top that represents the nut, so it's easy to determine at a glance if you need to be concerned about what fret the diagram is starting from.

Add a capo at the fret indicated on the chord diagram. If you look at a chord diagram that has a "C" with a number next to it, that tells you to place a capo at the fret indicated by the number. A capo is simply a device that clamps all of your strings at a certain fret, putting your guitar at a different key. Especially when you're just starting out, you'll love the capo because it enables you to play simpler versions of more complex songs. When you place your capo, it takes the place of the nut in the diagram. So the next fret down from the capo is the same as the 1st fret on the diagram.
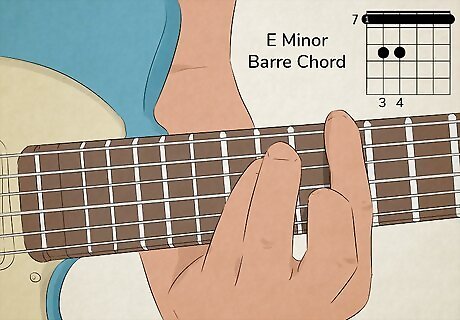
Use the barre technique if you see a curved line above the nut. On a chord diagram, a curved line above the nut indicates that you place your index finger at the top fret indicated to fret all of the strings under the curve. The rest of the notes are fretted the same as notes on any other chord diagram. Some diagrams also use a solid bar across the barred strings, so be familiar with both ways of showing a barre chord on a chord diagram. If you're just starting out, you might not have developed the finger strength yet to play barre chords. But once you do, you'll discover a whole new range of songs that you can play, including a lot of rock and pop songs.


Comments
0 comment