
Creating Templates
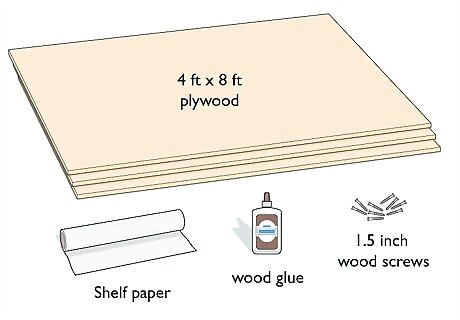
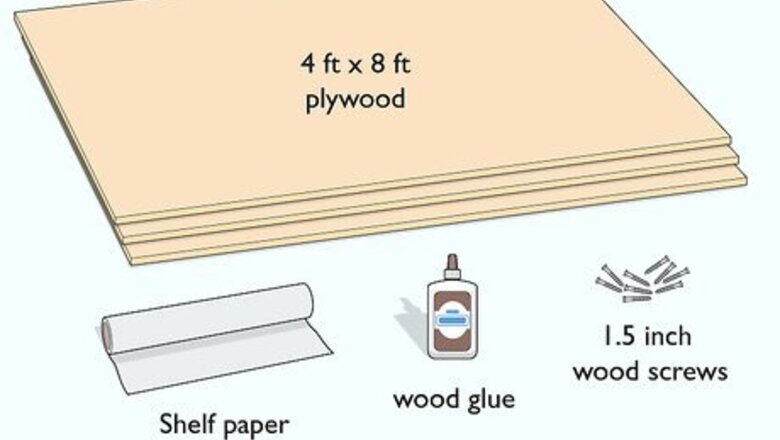
Gather your materials and tools to build the coffin. Buy a roll of shelf paper, 3 ⁄4 in (1.9 cm) 4 ft × 8 ft (1.2 m × 2.4 m) sheets of plywood, 1.5 in (3.8 cm) wood screws, and wood glue at a home improvement center. Make sure you have a circular saw, an electric drill, a pencil, and a measuring tape to measure and cut out the pieces and put them together. If you don’t have power tools, you can rent them at a hardware store or home improvement center. If you want a nicer-looking simple coffin for burial purposes, you could make it out of pine instead of plywood.
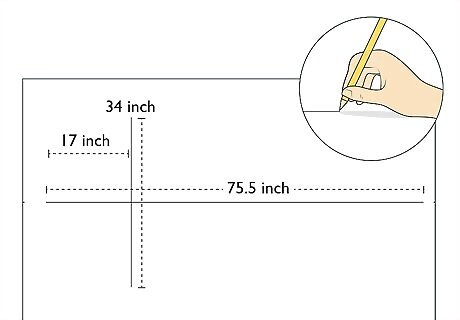
Draw the center lines of a template on 2 pieces of shelf paper taped together. Draw 1 75.5 in (192 cm) straight line lengthwise down the middle of the shelf paper. Draw a 34 in (86 cm) perpendicular line 17 in (43 cm) down from the top of the first line.Tip: If you can’t find shelf paper, you can use any other type of large paper that comes in rolls, such as butcher paper. The resulting line will be the shape of a cross. This will help you create the outline of the coffin. Shelf paper is paper used for lining shelves that comes in big rolls. Tape 2 pieces together side-by-side to make a piece wide enough to create your template. Note that you can change the dimensions of the coffin by adjusting any of the measurements.
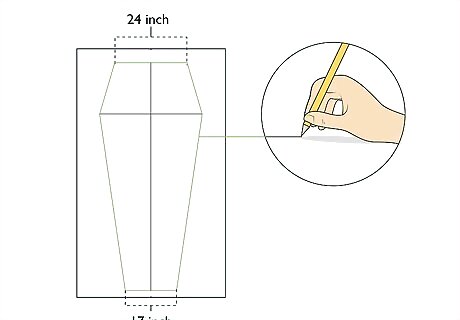
Create the outline of the coffin’s lid using the center lines as guides. Draw a 24 in (61 cm) horizontal line at the top of the cross shape and a 17 in (43 cm) horizontal line at the bottom. Create the side lines by drawing straight lines to connect the ends of all the horizontal lines. You will now have the completed outline of your coffin.
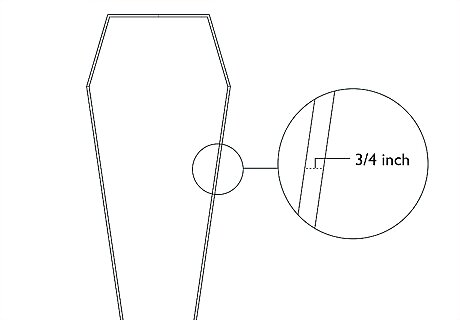
Make a second template that is ⁄4 in (1.9 cm) smaller for the base. Cut out the first template and trace it onto another 2 pieces of shelf paper taped together. Measure in ⁄4 in (1.9 cm) all the way around and draw the new, smaller outline in the middle. Cut this new template out as well. This will be the template for the base of the coffin. It needs to be ⁄4 in (1.9 cm) smaller so the sides can be screwed around it.
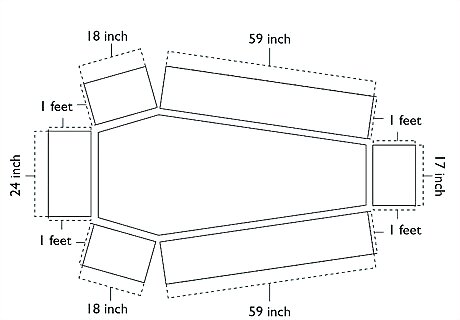
Create templates for the sides on 1 ft (0.30 m) wide strips of shelf paper. Measure and cut a 24 in (61 cm)-long by 1 ft (0.30 m)-wide piece for the top of the coffin and a 17 in (43 cm)-long by 1 ft (0.30 m)-wide piece for the bottom of the coffin. Make 2 18 in (46 cm)-long by 1 ft (0.30 m)-wide pieces for the short sides and 2 59 in (150 cm)-long by 1 ft (0.30 m)-wide pieces for the long sides. This will give the coffin a depth of 1 ft (0.30 m). Feel free to make it shallower or deeper by using thinner or wider strips of shelf paper for the templates.
Cutting Pieces
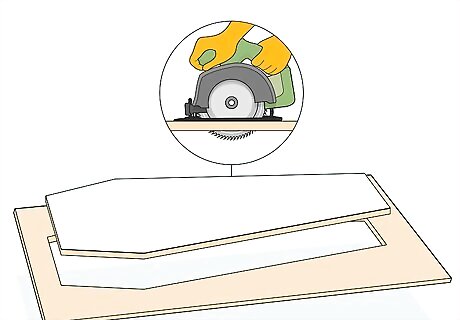
Use a circular saw to cut the base of the coffin out of plywood. Trace the base template onto a ⁄4 in (1.9 cm) 4 ft × 8 ft (1.2 m × 2.4 m) sheet of plywood. Clamp the plywood to a pair of sawhorses or a flat workbench so the cut lines are hanging off the edge and cut out the base of the coffin. Make sure you are using the smaller of the 2 outline templates you made for the base or the sides won’t fit properly around it.
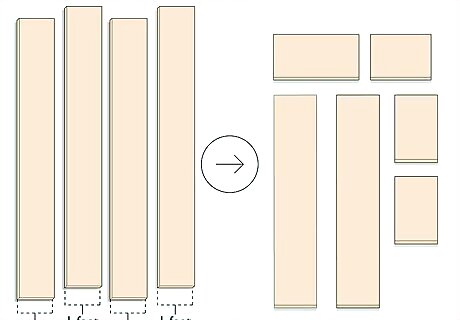
Cut the sides out of plywood using a circular saw. Cut a ⁄4 in (1.9 cm) 4 ft × 8 ft (1.2 m × 2.4 m) sheet of plywood into 4 1 ft (0.30 m)-wide strips. Trace the side templates you made onto the strips and cut the 6 sides to the right lengths using a circular saw. You can get the plywood pre-cut into 4 strips at a home improvement store if you want to save time. Keep in mind that you need to mark the short and long sides of the coffin twice.
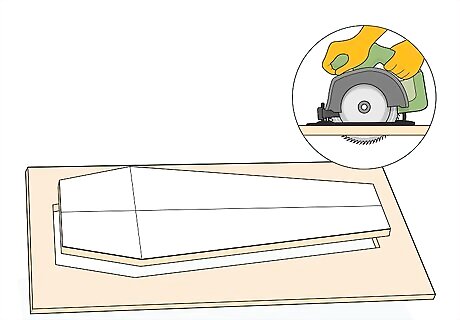
Cut out the lid of the coffin with a circular saw if you want a lid. Use the first outline template you made to trace the outline of the lid onto a 4 ft × 8 ft (1.2 m × 2.4 m) sheet of plywood. Clamp the plywood to a flat workbench or sawhorses so the cut lines are hanging off the edge and use your circular saw to cut out the outline of the lid. You don’t have to cut out a lid if you want to make an open coffin as a decoration or prop. If you are planning to use it for burial, you need a lid.
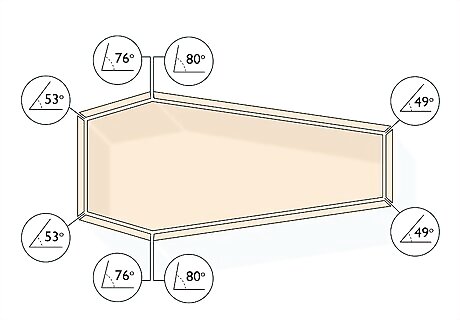
Miter-cut the ends of the side pieces at the right angles so they fit together. Miter-cut the top of the coffin and the 2 short sides that connect to it at 53-degree angles. Cut the short sides where they connect to the long sides at 76-degree angles and the long sides where they meet at 80-degree angles. Miter the bottoms of the long sides and the bottom piece at 49-degree angles.Tip: Don’t worry too much about how perfect the angles are if you're just planning to use the coffin as a Halloween decoration. Nobody is going to inspect the coffin closely enough to notice that the sides aren’t perfectly mitered. You can either use a power miter saw or set the blade to different angles on your circular saw to make the cuts. If you use your circular saw, you will need to clamp the pieces to a flat work surface with the cut lines hanging off. If you use a power miter saw, you can secure the pieces in the built-in miter box to make the cuts. Even if you adjusted the measurements of the coffin, use these angles for the mitered cuts.
Assembling and Finishing
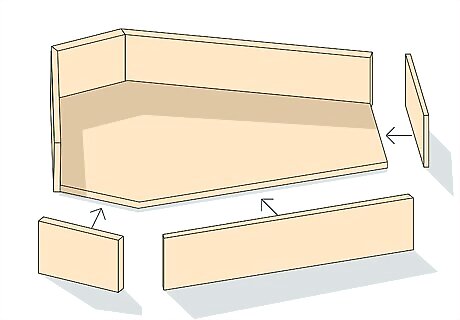
Lay the side pieces around the base of the coffin and dry-fit them. Put the base of the coffin on the ground or a large flat work surface and lay out the side pieces around it. Test-fit everything to make sure all the sides fit correctly before you start attaching them. You can make any adjustments to the angles cuts on the side pieces here if needed to get everything to fit together.
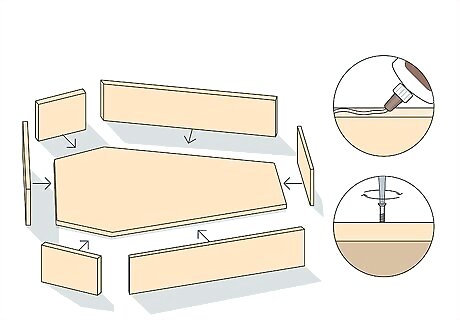
Attach all the sides with screws and wood glue. Put a thin bead of wood glue all the way around the edges of the coffin’s base and on the angled edges of the side pieces. Stand the sides up around the base, one-at-a-time, and use an electric drill to put a 1.5 in (3.8 cm) wood screw in through the sides where they meet the edge of the base every 5 in (13 cm) or so. Screw the sides together where they meet once you have secured them all around the base of the coffin.Tip: If there are any cracks where the sides don’t fit together perfectly, you can simply fill them in with wood filler to hide them. Don’t worry about the exact number of screws you use and getting the spacing perfect. As long as the sides feel securely attached, it’s fine.
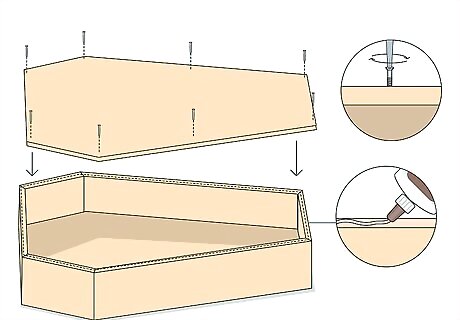
Put the lid on using screws and wood glue or a piano hinge if you made a lid. Attach the lid by putting a thin bead of wood glue along the top edges of the sides and securing it in place with 1.5 in (3.8 cm) wood screws if you don’t want a casket that opens. Attach it with a 48 in (120 cm) piano hinge to 1 of the long sides if you want the casket to open and close. If you want to give people a scare on Halloween, you can dress up and hide inside a coffin with a lid attached by a piano hinge, then pop out to frighten trick-or-treaters or party guests. If you’re planning to use the coffin for burial, secure the lid in place after the deceased is inside it.
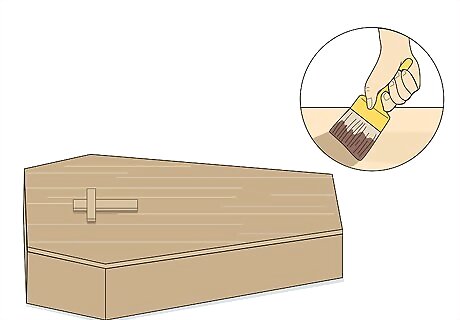
Add any finishing touches to the coffin that you want. Paint or stain the coffin if you don’t want to change the color. Glue fabric, such as felt or velvet, to the inside using wood glue or school glue to give it a more polished look if you want people to see inside of it.


Comments
0 comment