views
Laying the Foundation
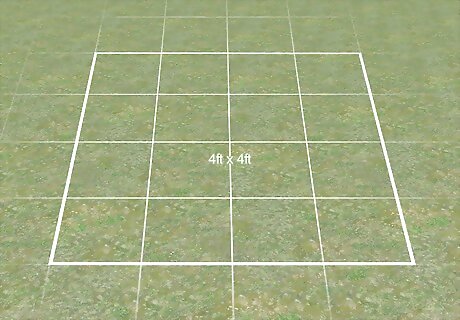
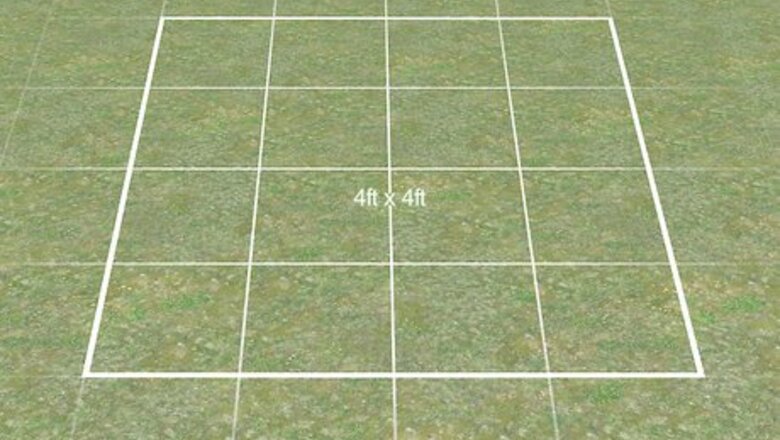
Find a level area to mark your foundation. Getting any structure ready (and your food to taste its best!) all starts with a level foundation. Find and mark a flat area that’s at least 4 ft × 4 ft (1.2 m × 1.2 m) and 50 in (130 cm) away from any other structure.
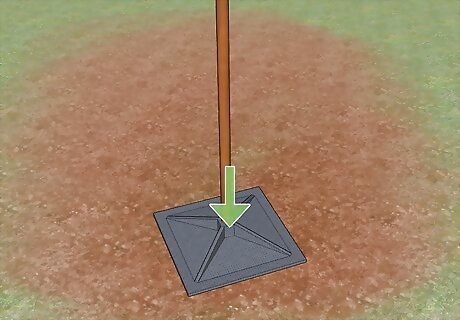
Level the ground with a tamper. Rest a level on a scrap 2 in × 4 in (5.1 cm × 10.2 cm) board and push it across the ground to check the grade. In areas where the ground isn’t level, use a tamper to compress the dirt and prepare it for the foundation.
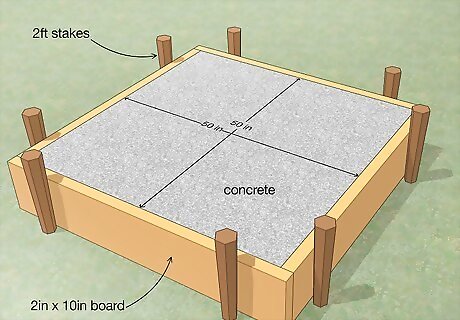
Build a mold for your foundation. Drive 8 24 in (61 cm) stakes into the ground to prop up 4 2 in × 10 in (5.1 cm × 25.4 cm) boards in the shape of a 50 by 50 in (130 by 130 cm) square. Mix your cement according to the instructions and slowly pour it into the mold. Smooth the top of the mixture with a 50 in (130 cm) plank, making sure the mold is completely filled. Run a knife along the edges of the concrete after it has been poured to make the mold easier to remove. Cure the concrete by completely dousing it in water over the course of three days. This will also help prevent heat-cracking.
Building the Walls
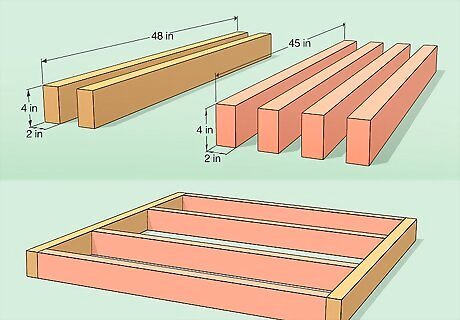
Build the frame of your floor. Cut 1 10 ft (3.0 m) 2 in × 4 in (5.1 cm × 10.2 cm) board into 2 48 in (120 cm) pieces and mark them every 14 in (36 cm). Cut a 16 ft (4.9 m) 2 in × 4 in (5.1 cm × 10.2 cm) board into 4 45 in (110 cm) sections. Lay the 2 48 in (120 cm) boards parallel to each other and attach the 4 other boards to each set of marks, their thin sides facing up. Use a carpenter square to ensure the angles between the boards are 90°. Drill pilot holes into the ends of each board before attaching them. Use 2.5 in (6.4 cm) screws to attach the boards.
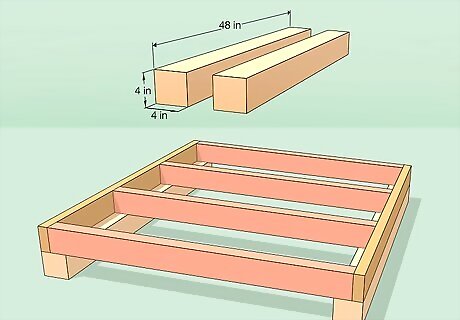
Create space between the floor and the ground. Cut an 8 ft (2.4 m) 4 in × 4 in (10 cm × 10 cm) board into 2 48 in (120 cm) sections and attach them on top of the 2 in × 4 in (5.1 cm × 10.2 cm) boards. Position the boards up with their ends against a straight piece of scrap wood to keep them aligned with each other. Treated wood will release toxic chemicals when heated, so only used untreated pine or cedar.
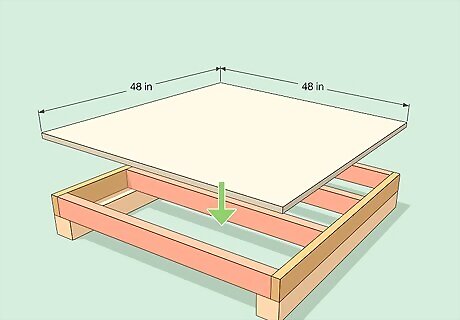
Screw on the plywood sheet to finish the floor. Use a 4 ft × 4 ft (1.2 m × 1.2 m) .75 in (1.9 cm) plywood sheet as the surface of the floor. Drill through the plywood down into the 4 in × 4 in (10 cm × 10 cm) boards with 1.25 in (3.2 cm) screws. In this build, the floor is 4 ft × 4 ft (1.2 m × 1.2 m), but you can customize the size up to 6 ft × 6 ft (1.8 m × 1.8 m) without affecting the ease of smoking.
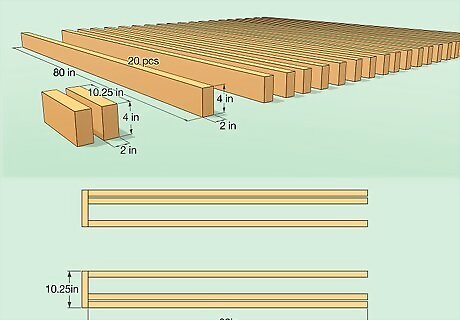
Build the front wall. Cut 10 16 ft (4.9 m) 2 in × 4 in (5.1 cm × 10.2 cm) boards into 20 80 in (200 cm) sections and 2 10.25 in (26.0 cm) 2 in × 4 in (5.1 cm × 10.2 cm) sections. On a 10.25 in (26.0 cm) board, make marks at 0”, 3.5 in (8.9 cm), and 10.25 in (26.0 cm). Attach 3 of the long boards at each mark, skinny side up. Repeat these steps to build the second column.
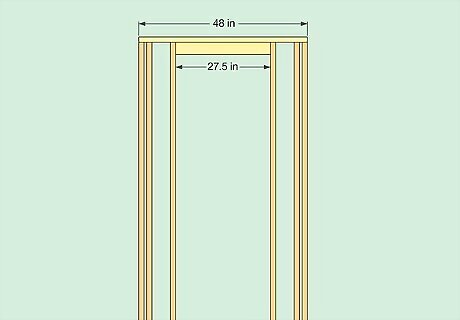
Attach the columns together. Drill the free ends into a 48 in (120 cm) 2 in × 4 in (5.1 cm × 10.2 cm) board cut from a 10 ft (3.0 m) plank. Cut an 8 ft (2.4 m) 2 in × 4 in (5.1 cm × 10.2 cm) board into 2 27.5 in (70 cm) sections, and attach 1 between the two columns under the 48 in (120 cm) board. Position the columns so the sides with two pieces of wood are against the outside edges of the board. Drill pilot holes into the tops and bottoms of the boards, and attach them with 2.5 in (6.4 cm) screws.
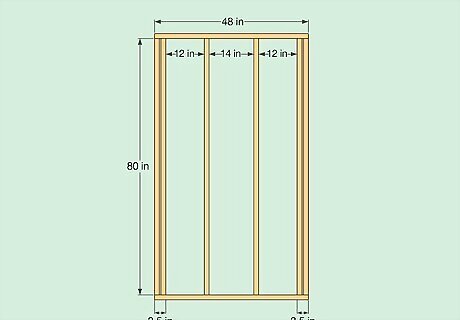
Assemble the back wall frame. Mark 2 48 in (120 cm) boards at 3.5 in (8.9 cm), 17.5 in (44 cm), 30.5 in (77 cm), 44.5 in (113 cm) and at both ends. Attach 6 80 in (200 cm) boards between them at each mark. Set this wall up the same way as the front, drilling pilot holes into the studs, using 2.5 in (6.4 cm) screws, and checking the angle with a carpenter square.
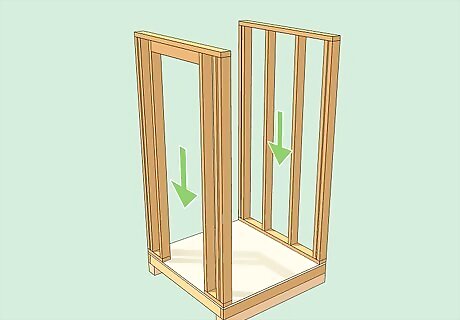
Attach the walls to the floor. Line up the edges of the front and back walls to the edges of the floor, and drill 3.5 in (8.9 cm) screws up from the floor into the studs. Make sure to connect the walls to the floor at 90° angles. To keep the walls from falling over, put tall, heavy objects on either side of them or make a temporary brace by screwing on a scrap piece of wood diagonally between the wall and the floor.
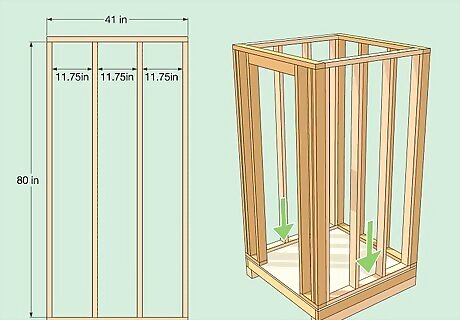
Complete the frame with the side walls. Cut 4 4 ft (1.2 m) 2 in × 4 in (5.1 cm × 10.2 cm) boards to be 41 in (100 cm) long. Mark 2 boards at 14 in (36 cm) and 27 in (69 cm), then attach 4 80 in (200 cm) 2 in × 4 in (5.1 cm × 10.2 cm) boards between them at the marks and flush to each end. Attach all the boards with their thin sides facing up. Drill pilot holes at the top of all the frames, remove any braces you made, and screw the side walls to the front and back with 2.5 in (6.4 cm) screws.
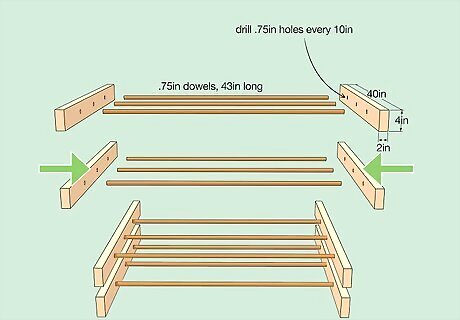
Build the racks. Take 8 48 in (120 cm) 2 in × 4 in (5.1 cm × 10.2 cm) boards and cut them to 40 in (100 cm). Use a .75 in (1.9 cm) hole saw bit to make holes at 10 in (25 cm), 20 in (51 cm), and 30 in (76 cm). Cut 43 in (110 cm) sections from 12 48 in (120 cm) .75 in (1.9 cm) dowels. Hammer dowels into each hole. Hammer the dowel until the end is flush with the other side of the board. Position the dowels straight up and align them with another 48 in (120 cm) board. Hammer the dowels into the top of the board to finish the rack.
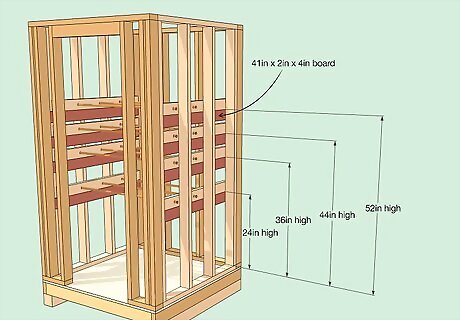
Install the racks. Cut another 4 4 ft (1.2 m) 2 in × 4 in (5.1 cm × 10.2 cm) boards down to 41 in (100 cm). On both sidewalls of the smokehouse, attach the boards 24 in (61 cm), 36 in (91 cm), 44 in (110 cm), and 52 in (130 cm) high. Bring the racks into the smokehouse at a diagonal, and then snap them into place. Depending on the size of your smokehouse, you can also use grill racks for this step. The dowels just make it easier to hang meat.
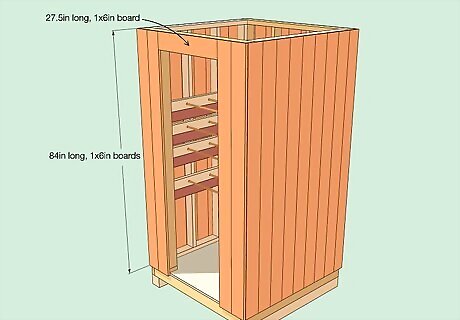
Panel the smokehouse. Cut 31 8 ft (2.4 m) 1 in × 6 in (2.5 cm × 15.2 cm) tongue and groove boards down to 84 inches (210 cm). Start by attaching boards to the back frame. In the front, nail a 27.5 in (70 cm) panel cut from a 12 ft (3.7 m) 1 in × 6 in (2.5 cm × 15.2 cm) board across the top of the opening. Use 9 panels for the back, 9 for either side and 4 for the front. To make everything fit smoothly, rip one panel on each of the side walls down to 3.5 inches (8.9 cm). Continue predrilling all your holes and use 2 in (5.1 cm) nails. Ripping is when you cut a board lengthwise along its grain. Tongue and groove boards lock together for a seamless look but aren’t strictly necessary. When installing the paneling, push the protruding edge into the groove of the board next to it.
Building the Roof
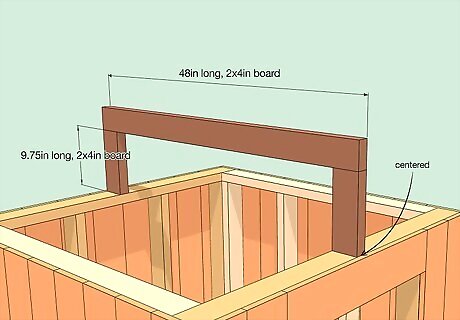
Create the top ridge of the roof. Mark holes at the center (24 in (61 cm)) of the door frame and back wall. Screw in 9.75 in (24.8 cm) sections cut from a 10 ft (3.0 m) 2 in × 4 in (5.1 cm × 10.2 cm) boards with 2.5 in (6.4 cm) screws. Check the tops of the supports with a level, then attach the 48 in (120 cm) 2 in × 6 in (5.1 cm × 15.2 cm) board. Predrill all of your holes to prevent the wood from splitting, and use the carpenter square to check the angles.
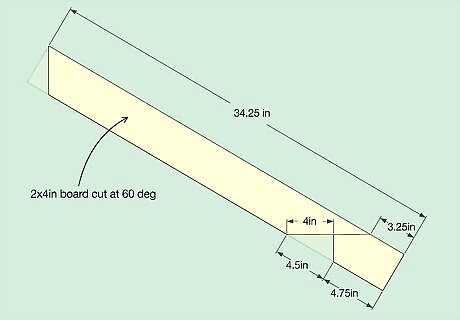
Cut your rafters to fit on the ridge. Cut 2 12 ft (3.7 m) 2 in × 4 in (5.1 cm × 10.2 cm) boards into 8 34.25 in (87.0 cm) sections. Cut one end of each plank at 60°—this will allow them to rest against the ridge of the roof. Make a birdsmouth cut 4.75 in (12.1 cm) from the bottom of the flat end of the rafters so they can fit over the frame. To make a birdsmouth cut, lay your rafter down with the angled side on the left and the acute side facing up. At the right end of the rafter, make a mark 3.25 in (8.3 cm) of the way up the top of the board. Make two more marks on the bottom at 4.75 in (12.1 cm) and 9.5 in (24 cm). Using your carpenter square, draw a straight line from the mark at 3.25 in (8.3 cm) down to the one at 9.5 in (24 cm), and then draw a perpendicular line up from the final mark at 4.75 in (12.1 cm) to the line you just made. Use a miter saw to cut out the triangle and you’re all done!
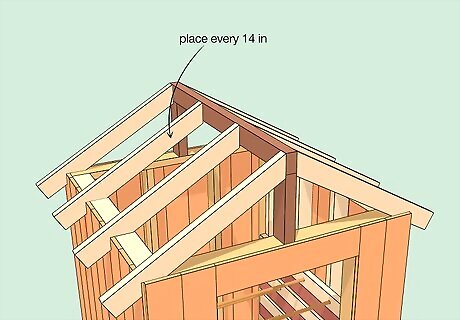
Attach the rafters to the ridge and frame. Place a rafter every 14 inches (36 cm) across the top, then drill pilot holes and fix them in place with 2.5 in (6.4 cm) screws.
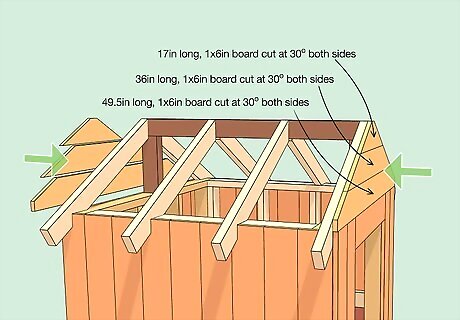
Fill in the space under the pitch of the roof. Cut a 16 ft (4.9 m) 1 in × 6 in (2.5 cm × 15.2 cm) board into 2 49.5 in (126 cm), 2 36 in (91 cm), and 2 17 in (43 cm) sections. To allow the boards to line up with the rafters, cut each side at a 30° angle. Nail the boards in place with 2 in (5.1 cm) 2 in (5.1 cm) nails. On the 49.5 in (126 cm) board, start the cut from the top at 6.75 in (17.1 cm) and end it 1.5 in (3.8 cm) above the bottom of the short side. Cut the middle board into a trapezoid with a 36 in (91 cm) base and a 17 in (43 cm) top, and the top board to have a 17 in (43 cm) base and a 1.5 in (3.8 cm) top.
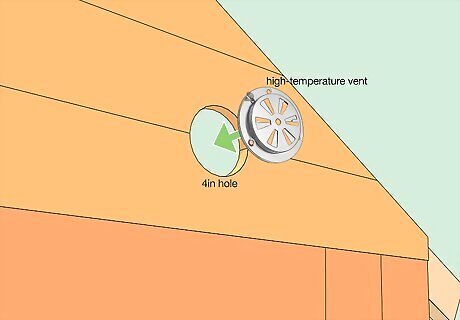
Install the vent. Use a 4 in (10 cm) diameter hole saw bit to make a vent between the bottom two boards. Attach a high-temperature vent over the hole by screwing it into the wood.
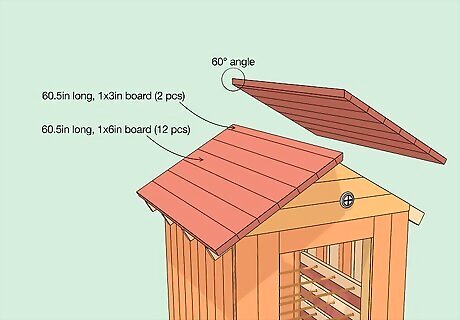
Roof the smokehouse. Cut a 12 ft (3.7 m) 1 in × 3 in (2.5 cm × 7.6 cm) board into 2 60.5 in (154 cm) sections and rip them to be 2.5 in (6.4 cm) at a 60° angle on one side. Cut 6 12 ft (3.7 m) 1 in × 6 in (2.5 cm × 15.2 cm) boards into 12 60.5 in (154 cm) sections, and nail them down the roof with 2 in (5.1 cm) nails.
Adding the Door
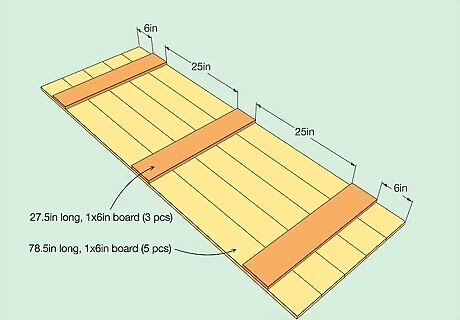
Build the body of the door. Cut 5 8 ft (2.4 m) 1 in × 6 in (2.5 cm × 15.2 cm) tongue and groove boards down into 78.5 in (199 cm) sections. Lay 2 27.5 in (70 cm) 1 in × 6 in (2.5 cm × 15.2 cm) sections across the planks 6 inches (15 cm) above the bottom and below the top of the opening for the door. Measure halfway between the planks—27.75 in (70.5 cm)—and attach a third. Line up the ends of the planks against a flat surface to ensure they’re straight. Use 1.25 in (3.2 cm) screws.
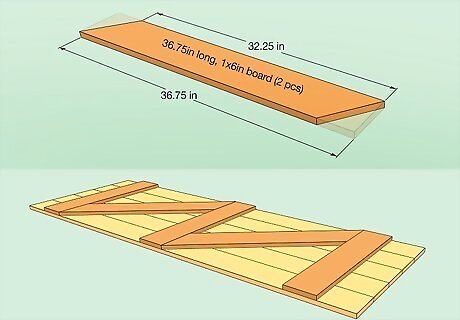
Brace the door. Cut a 8 ft (2.4 m) 1 in × 6 in (2.5 cm × 15.2 cm) board into 2 36.75 in (93.3 cm) sections. Cut the ends at a 51° angle with a miter saw. Line the ends of the braces to the 3 horizontal boards (it will make a “Z” shape) then attach them with 1.25 in (3.2 cm) screws. Start the cut at one edge of the board and end it 4.5 in (11 cm) up the other side.
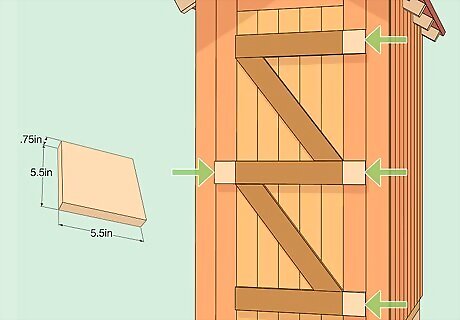
Build supports for the door hinges and latch. Cut a 4 ft (1.2 m) 1 in × 6 in (2.5 cm × 15.2 cm) board into 4 5.5 in (14 cm) sections. Attach the sections squarely on the edges of the horizontal boards, with the block for the latch across the door from the middle hinge block.
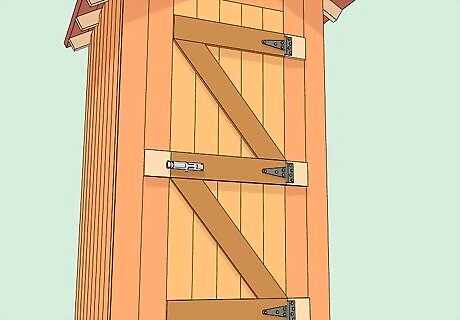
Screw the hinges and latch onto the door. Place a 6 in (15 cm) barn door hinge on the center edge of each support. Attach the hinges with screws, then fit the other sides onto the door frame. After screwing the door to the frame, test that it opens and closes easily. On the opposite side of the door, attach the latch.
Heating and Insulating Your Smoker
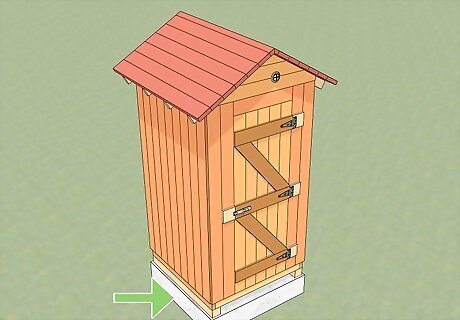
Attach the house to the foundation. Cut 1 6 ft (1.8 m) 1 in × 2 in (2.5 cm × 5.1 cm) board into 2 33 in (84 cm) sections and connect them to the outside base of either wall. Predrill holes in the concrete, and then attach the planks with 3.75 in (9.5 cm) expansion anchors.
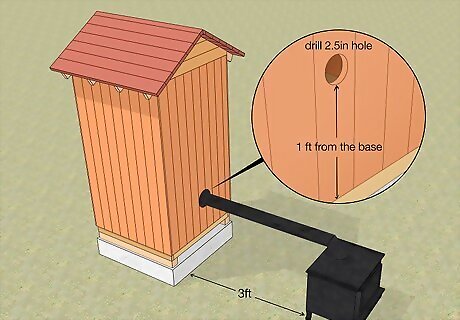
Install the stove. This build uses an external woodstove as the heat source for the smoker. Make a hole 12 in (30 cm) up from the base of the back wall with a 2.5 in (6.4 cm) hole saw bit. Set up your stove at least 3 feet (0.91 m) away from the smokehouse and run the pipe through the hole. To get the pipe to run horizontally, attach an elbow at the top of the stove.
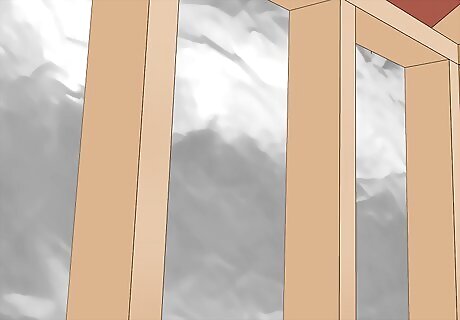
Insulate your smokehouse. There are a few ways you can insulate your new smokehouse, depending on what materials you can access. The simplest method is to use a staple gun to cover the inside walls with heavy-duty aluminum foil—think wallpapering. You can go even further by first insulating everything with wool batting, then attaching your aluminum foil. Don’t use any galvanized metal—heating it will release toxic fumes. Leave your vent and the opening for the pipe uninsulated to ensure proper circulation. You don’t want the wool to be in contact with the smoke though, so wrap the foil under the edges and staple them in place.
Using Your Smokehouse

Choose your smoke flavor. Now that you have the smokehouse, it’s time to get cooking! You can use a variety of woods, but some of the most popular are hickory, pecan, apple, and mesquite. To get smoking, load your stove with your wood of choice and light it with a torch.
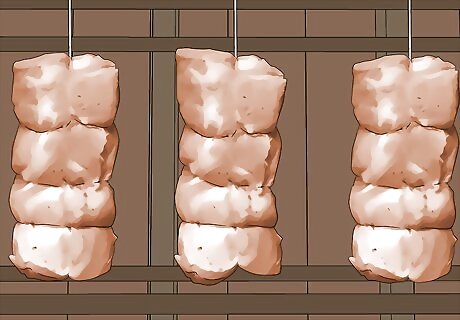
Prepare your meats. To smoke your food, hang it from the dowels with metal hooks. If you’re smoking something long, like a sausage, you can put it directly over the rack. Always spray cooking oil on surfaces that come in contact with food. If you’re using grill grates, season them before use.
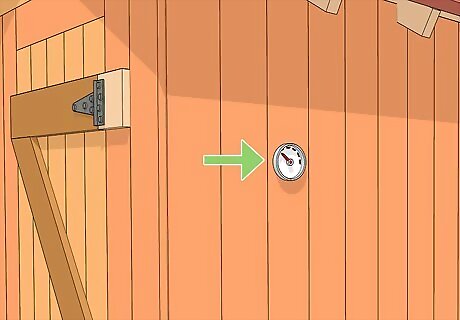
Control your temperature. Smoking meat is a long process, and the temperature has to stay consistent the whole time. By attaching a probe thermometer to the outside of the smokehouse and hanging a probe over one of the racks, you’ll have an accurate reading of what’s going on inside. These thermometers often have an alarm you can set to a certain temperature. This way you’ll never accidentally let it get too hot! Use a heavy duty adhesive or build a small shelf to keep the thermometer on the wall. To lower the temperature, open the vents above the door. If you need to cool it down quickly, you can always open the door itself.


Comments
0 comment