
Pending App Store Purchase
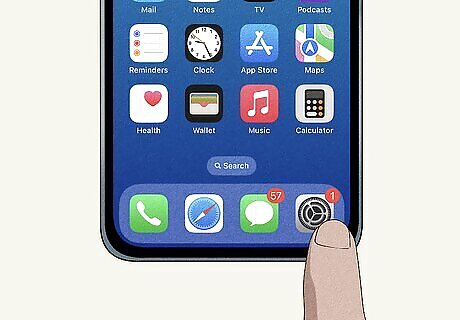
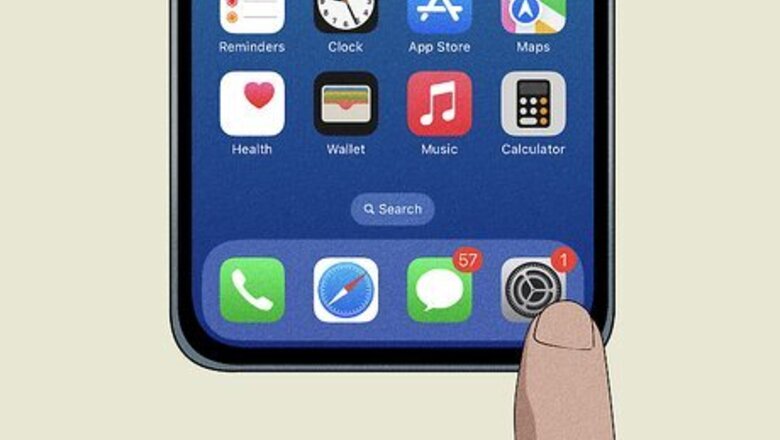
Open your Settings app and tap on your name at the top. The main reason you might be getting a "verification required" message is because you have a pending App Store purchase that needs to be resolved first. This is usually caused by an App Store payment that wasn't able to be completed because your payment method was declined (usually due to insufficient funds).
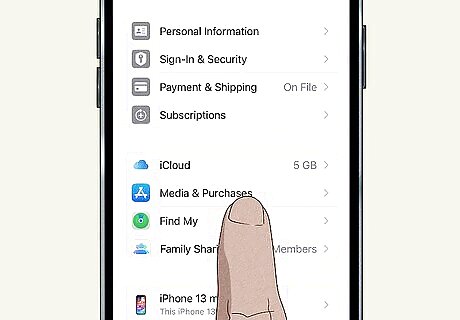
Tap Media & Purchases. It's in the second section of buttons, underneath the iCloud button. It has an App Store icon on the button.
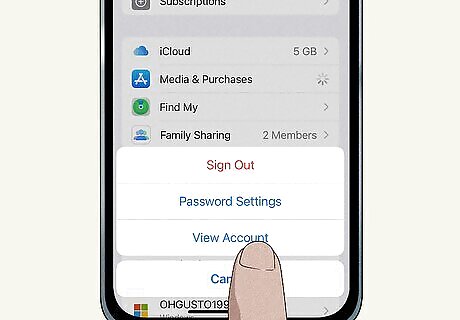
Tap View Account. Hold your device still while looking at it, as you may need to do Face Verification to unlock this menu.

Tap Purchase History. It's the third button in the top section, between Subscriptions and Add Money to Account.
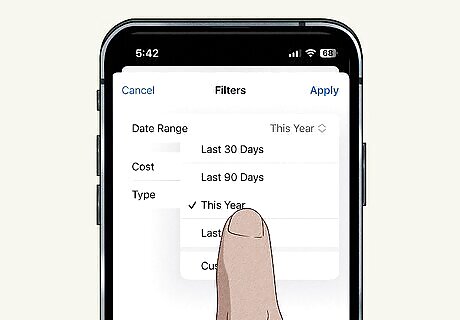
Use the filter to look for any purchases highlighted red. Tap on the blue text next to "Showing:" to edit the filter. Tap This Year to view all of your purchases from the current year and Last Year to view all of your purchases from the previous year. While it's unlikely, you may need to tap Custom and select a different year to view your past purchases. If you can't find any unpaid purchases in the This Year or Last Year filters and you haven't been able to download a free app in a long time, you may want to start looking through those past years' filters.
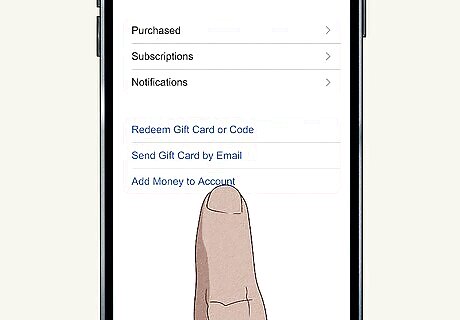
Pay the remaining balance. There are three ways to do this, explained step-by-step below: Change your payment method. If you add a new payment method (that can cover the cost of the outstanding balance) and remove your old payment method, the new payment method will be charged immediately and your account will be out of the red. Use a gift card to pay the balance. First, purchase an Apple Gift Card or App Store & iTunes Gift Card in an amount that will cover the balance, then redeem it with your Apple ID (either in the App Store or by going to Settings > your name Payment & Shipping > Apple ID > Redeem). Once you do this, return to the Purchase History menu (Settings > your name > Media & Purchases > Your Account > Purchase History) and tap on the purchase highlighted with red text. Tap Pay with Apple ID Credit to immediately resolve your outstanding balance. Add money from your Apple Wallet to cover the balance. To start, tap < Back on the Purchase History screen to go back to your account settings. Tap the Other option, unless you want to add a flat amount to your account. You can add more money to your Apple account then what is needed, if you want to use the leftover balance to purchase apps, music, and more. Enter the amount you want to pay, then tap Next. You can enter the exact amount that you owe, or more. This money will be taken from your primary payment method connected to your Apple ID (Apple Cash, a credit/debit card, or PayPal.) Confirm the transfer. You may need to double-click the side button, enter your password, or do Face ID verification (depending on your settings). Once the payment goes through, the money will be added to your Apple ID. Return to the Purchase History menu (Settings > your name > Media & Purchases > Your Account > Purchase History), tap your outstanding balance and select Pay with Apple ID Credit.
No Payment Method Set
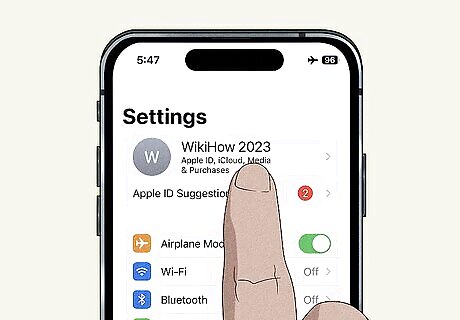
Open the Settings app and tap your name. Even if you want to get a free app, you need to have a payment method saved to stop getting "verification required" pop-up messages.
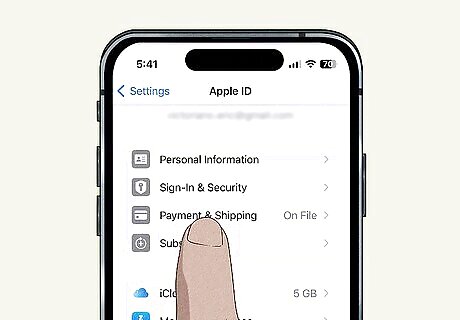
Tap Payment & Shipping. It's the third button down in the top section, and it has a gray and white icon of a credit card on it. Hold your device still once tapping on this option, as you may need to do Face Verification to unlock this menu.
Tap Add Payment Method. If you have no payment methods saved on your account, you will need to add one. You can do one of the following: Tap the None option. If you don't have any active subscriptions, you aren't in a Family Sharing group, and you don't have an unpaid balance, you can select None as a payment option. This will make it so you can download free apps without having to add any payment information. If you can't select None and you don't have any subscriptions, Family Sharing groups, or unpaid balance, you'll need to contact Apple Support for further help. Add a valid payment method for your country to your Apple ID. You can use this Apple support page to see what payment methods are valid where you live. Apple won't charge you for anything unless you give explicit permission, so you don't have to worry about random charges showing up on your bill from Apple if you add a payment method. Add a gift card to your Apple ID balance. You can buy Apple gift cards from a variety of retailers for as little as $5. Buying a gift card and redeeming it with your Apple ID counts as a payment method, and if you only get free apps you can leave the balance there indefinitely. To redeem a gift card, tap the < Back button from the payment screen and select Apple ID > Redeem. Make sure you purchase a gift card that can be used with the Apple Store. The only Apple gift card that you can't redeem on your device is an Apple Store Gift Card, which is either silver, gray, white, or gold with a shiny Apple logo on the front. Any other Apple gift card will work for this method.
Wrong Payment Information
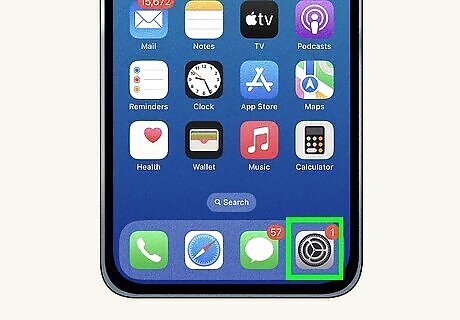
Open the Settings app and tap your name. If your payment information is wrong, the App Store won't be able to complete your purchase (even if the purchase is for a free app).
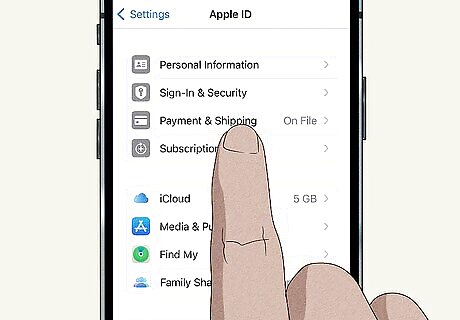
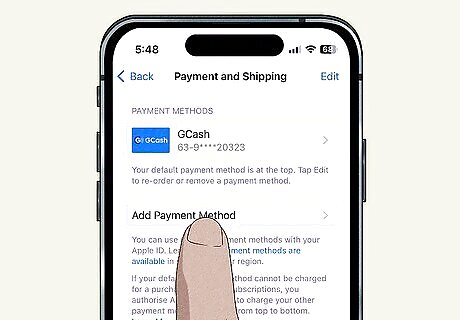
Tap Payment & Shipping. It's the third button down in the top section, and it has a gray and white icon of a credit card on it. Hold your device still once tapping on this option, as you may need to do Face Verification to unlock this menu.
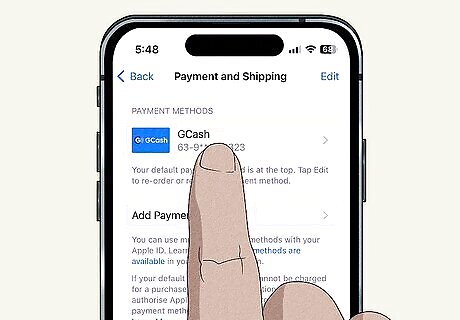
Tap your default payment method. Your default payment method is the one at the top, excluding Apple ID (which will always be at the top of this list).
Confirm your payment details are correct. If you have a credit or debit card added, make sure the card number, security code/CVV, and your billing address are correct. If you have a PayPal account added, make sure the PayPal email and billing address are correct. To fix any of these details, tap the Edit button in the upper-right corner, then fix the errors. When you're done, tap Done in the upper-right corner to save your changes.
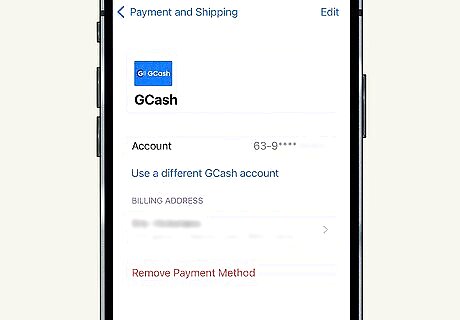
Invalid Payment Method
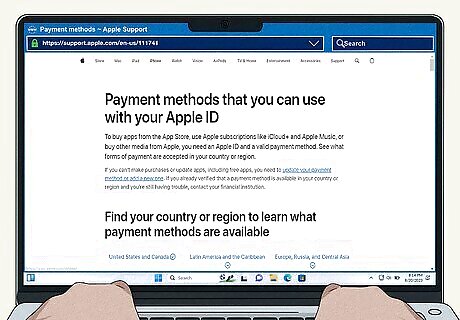
Check what type of payment methods are allowed in your country. Depending on where you live, you may not be able to use certain payment methods with your Apple ID. If you recently moved to a new country or you're a new Apple user, you may not be aware of what payment methods are allowed where you live. These restrictions can also change over time, so a payment method that was previous allowed may not be allowed now. Go to Apple's support page that details what payment methods are valid for each country. Click your region at the top, then scroll to your specific country. Note what payment methods are valid.

Check what payment method you have added to your Apple ID. You can do this by going to Settings > your name Payment & Shipping. All of the payment methods added to your account will be listed at the top of the screen.

Remove any invalid payment methods. If you have a payment method added that isn't valid in your country, tap it and then tap the red Remove Payment Method button at the bottom of the screen.
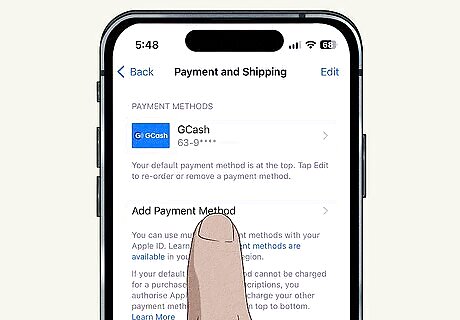
Add a new payment method. Tap the < Back button in the upper-left, then tap Add Payment Method. Select a valid payment method for your country, then add in the relevant details. When completed, tap Done in the upper-right corner.
Contact Apple

Get in touch with Apple Support if none of these methods work. If you've gone through all of the methods in this article and nothing fixes the issue, you'll need to contact Apple Support for further individualized help. Call Apple Support by going to Apple Support's website, typing your issue in the search bar (under "Tell us what's happening"), then scrolling down and clicking Call. Select Call Now or Schedule a Call, then enter your information and click Continue. Follow the on-screen prompts to get your call scheduled. Chat with Apple Support online by going to Apple Support's website, typing your issue in the search bar (under "Tell us what's happening"), then scrolling down and clicking Chat. Enter your information and click Continue. Follow the on-screen prompts to start chatting with an Apple Support representative.


Comments
0 comment